Tag Archives: v2.1.3

The coalescent SIR model in BEAST

18 August 2014 by Remco Bouckaert

Today, we have a look at Volz’s coalescent SIR model, which is an epidemic model that assumes there are three states: susceptible (S), infected (I) and removed (R). To use it, you need to install the phylodynamics package through the package manager. You might want to use coalescent SIR instead of birth-death SIR (BDSIR) — also in the phylodynamics package — since the coalescent model can give smaller confidence intervals.

The coalescent SIR model

The model allows you to estimate the basic reproduction number, R0, which is the average number of people that become infected by each one that is infected. R0 is important, since it mostly determines the size of an epidemic. Other parameters in the model are the transmission rate beta, which is the rate at which new infections arise and the removal rate, gamma. Gamma is often called ‘recovered’ instead of ‘removed’, but since there are other ways to get into state R (by patients dying, or by becoming a sample in our data) the term ‘removed’ is more accurate. Beta and Gamma can be interpreted as birth and death rates, moving from susceptible state S into the infected state I and from the infected state I into removed state R. Further, there is the initial size of susceptible population S0 and time of origin of the infection z0. Obviously, z0 must always be before the root of the tree. At z0, it is assumed there is just a single infected person and throughout the epidemic the population size is constant at size S0+1. For more information, see this paper.

In summary, we have

  • R0, basic reproduction number
  • beta, transmission rate
  • gamma, removal rate
  • S0, initial number of susceptibles
  • z0, time of origin.

Some of these parameters are functionally related through R0=beta*S0/gamma. This means, you can estimate either R0 or beta, and all the others, and then calculate R0 or beta through the formula. There are two implementations: a deterministic and a stochastic one. The stochastic model simulates trajectories of S, I, and R by a jump process while the deterministic model solve a set of ODEs for S, I and R. The stochastic model is much slower — it can be 3 times slower than deterministic — however, stochastic processes more closely represent reality and incorporating them may significantly affect the inference in some cases. For large R0 >1.5 and large S0, deterministic coalescent SIR is both faster and accurate, but for small R0 <1.5 deterministic tends to have the smallest positive bias on R0 and more often have R0 in the 95%HDP (in a simulation study comparing stochastic SIR, deterministic SIR and BDSIR).

Using the model in XML

To use the model, you incorporate serially sampled data by specifying a date trait for sequences.

First, add state nodes to the state element — values need to be adapted for your analysis. Good values help in getting convergence — bad values may result in the chain getting stuck. Makes sure the origin is old enough that it comes before the root of the tree. An error will be thrown when it does not. Here, we estimate R0, and derive beta, so there is no state node for beta.

To set S0 take an estimate of the population size of the area susceptible to the epidemy.
Basic reproductive number R0 must be larger than 1 (otherwise there will be no epidemic) and people disagree on what a high value of R0 is — some say 2.5, but others think 10 is possible.
Gamma removal rate: a high gamma (like in the current ebola outbreak) means fewer overall infected people, high chance of death or quarantine, or recovery with immunity.
z0 must be above root of initial tree, but setting it too high means burn-in may take a long time, so lower values are recommended.


Add priors to element with id=”prior” for S0, R0, gamma and origin — these are just default priors, but if you have more information you should adapt these. For origin z0 – typically not much info available, so uniform with a limited upper bound will do. Note uniform[0,100] means there is 99% that origin is over 1 — check your units of time whether this is relevant for your analysis.


The CSIR model is effectively a tree prior, so we add it to the element with id=”prior”. This adds a deterministic CSIR prior to the analysis (for stochastic CSIR, see below):


Now, we add operators — in this case beta is solved through R0=beta*S0/gamma, so only operators for S0, gamma, R0 and origin are added:


If you have an up-down operator for clock and tree, add origin


If you want to know what the parameters are, add loggers to the trace-log:


Run the analysis in BEAST. There are R scripts (ask Alex Popinga) to get nice plots from these.

The stochastic coalescent SIR model

To add the stochastic CSIR model instead of the deterministic one, the only difference is that the tree prior should be replaced by this:


It is best to set minTraj=1 and minTrajSuccess=1 initially. If there are mixing problems, increase minTraj and minTrajSuccess (minTrajSucces<=minTraj). Increasing numSamplesFromTrajectory will slow things down considerably. 101 tends to be good enough, but in bad mixing increasing it may help, but will slow things down more than increasing minTraj, so try that first.

Coming up

There should be a BEAUti template soon so you can select Coalescent SIR as tree prior and do not worry about the details of the XML.

All about starting trees

28 July 2014 by Remco Bouckaert

Before starting an MCMC run, BEAST uses State Node initialisers to set up the starting trees (and other parameters). Often a good starting tree is already available from another analysis (e.g. a maximum likelihood tree). Though it is against the spirit of MCMC, which guarantees any random starting state will lead to convergence, a good starting tree can help with large analysis to speed up convergence quite a bit. Of course another reason to specify a starting tree is if you want to do an analysis using just a single known tree topology.

We start with standard analysis, but see below for *BEAST analyses.

Standard analysis

For a standard analysis, there are three ways to specify a starting tree

  • a random tree
  • a tree in Newick format
  • a cluster tree, e.g. through UPGMA or neighbour joining

By default, BEAUti uses a RandomTree state-node initialiser to generate a starting tree. If you want to replace it with a Newick tree or cluster tree, first you need to remove (or comment out) the RandomTree element from the XML. For a tree in partition XYZ26, just search for RandomTree and remove the XML fragment with id RandomTree.t:XYZ26. It should look something like this:


        1.0
    

Before removing, make note of the initial attribute (@Tree.t:XYZ26> here) and taxa attribute (@XYZ26 here).

Newick starting tree

After removing the Random tree, in the same place, add a TreeParser using the following fragment


The attributes that you want to specify are

  • id="NewickTree.t:XYZ26" the ID should be unique, so something like NewickTree.t: plus the name of the tree would be suitable.
  • initial="@Tree.t:XYZ26" this refers to the tree being initialised. It should be the same as the initial attribute of the RandomTree that was removed.
  • taxa="@XYZ26" this refers to the alignment and ensures that taxa in the tree are lined with those in the alignment. For BEAST v2.1.x, this must be specified to prevent starting with a mislabelled tree
  • newick="((your,(tree,goes)),here)" obviously needs to be replaced with your own tree in Newick format.

This is all you need to know to set up a starting tree. There are a few optional attributes you can use to make life a bit easier:

  • adjustTipHeights is true by default, which means tips of the tree will be set to zero, or if tip dates are specified to these particular tip dates. By setting to adjustTipHeights="false", tips will be initialised by the heights in the Newick tree.
  • if adjustTipHeights="false" then threshold specifies threshold under which node heights (derived from lengths) are set to zero. This helps when there are numeric issues with adding the lengths.
  • scale scale used to multiply internal node heights during parsing. Useful for importing starting from external programs, for instance, RaxML tree rooted using Path-o-gen.
  • IsLabelledNewick="true" Is the Newick tree labelled (alternatively contains node numbers)?
  • If sLabelledNewick="false" then “offset="1" is the lowest taxa number. The default=1 but 0 is common as well. Taxa numbers are as they are ordered in the alignment referred to with the taxa attribute.

Cluster tree

After removing the Random tree, in the same place, add a ClusterTree with the following fragment


The attributes that you need to specify are id='UPGMATree.t:XYZ26', initial="@Tree.t:XYZ26" and taxa="@XYZ26", which are as for Newick tree (see above).

You can use different clustering algorithms by specifying the clusterType="upgma" attribute.

clusterType Description
single single link
complete complete link
upgma or average UPGMA=average link
mean mean link
centroid centroid
ward Ward’s method
adjcomplete adjusted complete link
neighborjoining neighborjoining
neighborjoining2 neighborjoining2 – corrects tree for tip data, unlike plain neighborjoining

*BEAST analysis

For a *BEAST analysis, the default in BEAUti is to generate a UPGMA tree for the species tree, then generate UPGMA trees for each of the gene trees and fit them inside the species tree. In previous incarnations of BEAST, a random tree was generated for species as well as for gene trees, but gene tree branches ending in leaves were lengthened such that each first coalescence of a gene tree was above the root of the species tree. Though this ensures that the gene trees fit inside the species tree, it leads to long burn-in times.

If you want to use a different starting tree for the species tree, first move (not remove!) the StarBeastStartState element generated by BEAUti to just before the run-element with id="mcmc". BEAUti will have generated some elements inside the start-state (such as the species-tree-prior) that we need elsewhere in the analysis. By moving the init element outside the run element, it will not activate the StarBeastStartState.

The StarBeastStartState looks something like this:


For every gene tree there will be a tree entry in the StarBeastStartState. To replace the species tree with a Newick tree, add the following fragment (at the place where the StarBeastStartState was):


The only thing to set up is the Newick using the newick attribute — all other attributes should be as they are (it is using the species tree, which is identified by the Species partition in every *BEAST analysis generated by BEAUti).

For each of the gene trees, you need to specify a tree as well. You can specify them using a Newick tree as for the Standard analysis (see above). Alternatively, you can use a random tree that is placed ‘above’ the species tree. To do this, you add for the first gene tree (just below the new Species tree start tree):


where you replace the initial='@Tree.t:26' and taxa="@26" attributes to match your tree (instead of 26, as in this example). For every subsequent gene tree, you add (below the first gene start tree):


where you replace the initial='@Tree.t:29' and taxa="@29" attributes to match your tree (instead of 29) and make sure the id is unique.

Testing with BEASTShell

16 June 2014 by Remco Bouckaert

One motivation for BEASTShell is to ease the burden of writing tests for BEASTObjects. Writing tests is never much fun, but a necessary requirement to gaurantee quality of software. Writing BEASTObject tests is more cumbersome than usual because there is a division of instantiating inputs and initialising the object, which is usually done in a constructor, but in BEASTObjects requires a call to initAndValidate. Now we have the BEASTShell and can construct BEASTObjects a lot easier, it should be able to write tests with a lot less code and effort.

Constructing BEASTObjects

One way to use BEASTShell is by having a BEASTShell interpreter and just use it to construct BEASTObjects with fragments of script. For example, a unit test for the Uniform distribution may look something like this

First, create an Interpreter

final bsh.Interpreter interpreter = new bsh.Interpreter();

Now, you can use the interpreter to create BEASTObjects, e.g.

// create the BEASTObject
Uniform d = (Uniform) interpreter.eval("new beast.math.distributions.Uniform(lower=1.0, upper=2.0)");

// use the BEASTObject as in any other test
assertEquals(1.5, d.getMean(), 1e-10);

You can use the assertEquals command from BEASTShell in your test as well.
Instead of the above, we can run the same test with

// first tell the interpreter to import classes
interpreter.eval("import beast.math.distributions.*");

// create beast.math.distributions.Uniform object and test
interpreter.eval("d = new Uniform(lower=1.0, upper=2.0);" +
		"assertEquals(1.5, d.getMean(), 1e-10);");

Tests in script files

If your tests become a bit more involved than just a line or two, you probably do not want to wrap the script in a Java string, where you need to escape all double quotes, and add quotes around invidual lines.

Just save the following script in a bsh file, say in file src/test/beast/shell/uniform.bsh

import beast.math.distributions.*
d = new Uniform(lower=1.0, upper=2.0);
assertEquals(1.5, d.getMean(), 1e-10);

You can create a JUnit test as per usual, and create an bsh.Interpreter to run the script, e.g, using

public class UniformTest extends TestCase {

	@Test
	public void testUniform() throws FileNotFoundException, EvalError {
		Interpreter interpreter = new Interpreter();
		File bshfile = new File("src/test/beast/shell/uniform.bsh");
		interpreter.eval(new FileReader(bshfile));
	}	
}

However, the test.beast.shell.ShellTest class provides a test environment that makes things even easier. Just create a test-class that derives from test.beast.shell.ShellTest and create a method that returns a TestSuite, like so

public class UniformTest extends ShellTest {
	
	public static junit.framework.Test suite() throws Exception {
		return addTests("src/test/beast/shell/uniform.bsh");
	}
}

The ShellTest will load TestHarness.bsh first and calls complet() defined in TestHarness.bsh — provided it gets to the end of the script. If something fails, instead of calling asserts, you can set super.test_failed = true; and ShellTest will indicate that the test did not pass.

Developing test scripts

I found that the easiest and fastest way to set up test scripts is to run tests interactively in BEASTStudio. The history records every command, and it is easy to copy and paste relevant bits of code into a script after playing with things in the console for a while.

The edit() command can help creating scripts, for example for creating a sequence interactively, use

bsh % import beast.evolution.alignment.*;
bsh % seq = new Sequence();
bsh % edit(seq);

A dialog pops up where you can set values of the sequence object.

After selecting OK, the seq variable gets assigned the values entered, but also the value/name pair sequence is printed, so you can copy and paste that into any script.

Roll your own models with BEASTShell

9 June 2014 by Remco Bouckaert

BEASTShell contains a number of classes that can be customised using script fragments, similar to the beast.util.Script class in BEASTLabs that we talked about before. This means that you can create customised loggers, substitution models, clock models, and a few other classes just by changing the XML that specifies a BEAST analysis.

The following table shows the classes, all in the beast.shell package, and the functions that the script is required to specify.

Class Base class/interface Required functions
BSHClockModel Base getRateForBranch(node, meanrate)
BSHDistribution Distribution calculateLogP()
BSHLogger Loggable init(out), log(sample, out), close(out)
BSHOperator Operator double proposal()
BSHParametricDistribution ParametricDistribution density(x), cumulativeProbability(x), inverseCumulativeProbability(p)
BSHSiteModel SiteModelInterface.Base getCategoryCount(), getCategoryOfSite(site, node), getRateForCategory(category, node), getCategoryRates(node), getProportionForCategory(category, node), getCategoryProportions(node)
BSHSubstitutionModel SubstitutionModel.Base getTransitionProbabilities(node, fStartTime, fEndTime, fRate, matrix)
BSHTreeDistribution TreeDistribution calculateLogP(tree, intervals)

Each of these classes have an input called x, which is a list of Functions. By default, the ID of a function is used as global variable in the script, but you can assign a name to a Function using the beast.shell.NamedFunction class. The following


assigns the name “param” to the value of birthRate.t:alignment, and when using the variable “param” in the script it will take on the value of birthRate.t:alignment.

Each of the script classes also have a value input, which can be used to specify a script. All inline text in an element will be passed to the value-input, which means you can put your script inside a CDATA block in the XML inside the XML element representing the script-object. For example, a BSHDistribution that is proportional to 1/X can be defined as this:


    calculateLogP() {return Math.log(1.0/param.getValue());}

Note that to access “param”, which implements Function, we need to call Function methods, like getValue.

For BSHDistributions, we only need to specify calculateLogP, but for BSHLoggers, we need to specify three functions: init (typically used for printing the header in the trace file), log (to print a log value) and close (which for trace files means doing nothing, but for tree files an “End;” is expected). When any of these functions is not specified, an exception is thrown at the time the corresponding method is called. Likewise, an exception is thrown if there is an error in the program or any other unexpected condition is encountered.

To the following specifies a BSHLogger that reports the square of a value if its value is less than 1, otherwise it reports the value.


Here, we use a CDATA block so that we do not have to worry about escaping special characters like the < in if (param.getValue() < 1) .... Otherwise, you would have to escape those characters, giving if (param.getValue() &lt; 1) ... making things quite hard to read. All text within the CDATA block is taken as literal text and passed to the value-input.

BEASTShell recognises some XML docment friendly tokens that are mapped on operators, so you can write if (param.getValue() @lt 1) ... instead. The full set of tokens is listed below.

token interpreted as
@gt >
@lt <
@lteq <=
@gteq >=
@or ||
@and &&
@bitwise_and &
@bitwise_or |
@left_shift <<
@right_shift >>
@right_unsigned_shift >>>
@and_assign &=
@or_assign |=
@left_shift_assign <<=
@right_shift_assign >>=
@right_unsigned_shift_assign >>>=

I prefer the CDATA block, but you know about some alternatives now. You do not need to limit yourself to the functions required by the BSH-classes, but can define any other function to be used by the script as well.

The following demonstrates usage of the BSHOperator as a scale-operator on a RealParameter:


 param.getUpper()) {
                return Double.NEGATIVE_INFINITY;
        }
        param.setValue(new Double(newvalue));
        return 0.0;
}
]]>

Note how it sets the value of the parameter, which it can do only because the input is a RealParameter but may fail when other objects are used as “param”.

Simulation Studies with BEASTShell

2 June 2014 by Remco Bouckaert

A few weeks ago, we had a look at a simultion study with BEAST, using the SequenceSimulator, LogAnalyser and R. Let’s do that study again, but now with BEASTShell, a package for scripting BEAST-objects. It is based on BeanShell, but has special extentions to conveniently deal with BEASTObject classes.

In the previous blog, I sampled sequences for a range of shape parameter values that seemed reasonable in my experience. However, the model assumes an exponential prior distribution over the shape parameters with mean 1, so arguably, that information is sufficient to draw shape values from. In this study, we will

  1. sample 100 values of the shape parameter from this prior distribution,
  2. sample an alignment with 10.000 characters using 4 gamma categories and one of the sampled shape paramter values
  3. run the analysis on the sampled data
  4. record the estimate of the shape parameter
  5. create a plot of sampled against estimated shape values

Let’s get started with BEASTShell. The easiest way to create scripts is using BEASTStudio, the BEASTShell GUI. First, we import a bunch of packages we are going to need. BEASTShell already loads a nuber of packages (javax.swing.event, javax.swing, java.awt.event, java.awt,java.net, ava.util,java.io, and java.lang) which makse it easy to create standard class instances.

import beast.evolution.substitutionmodel.*;
import beast.evolution.sitemodel.*;
import beast.evolution.alignment.*;
import beast.util.*;
import beast.core.*;
import com.xeiam.xchart.*;
import beast.app.shell.*;

First, we draw gamma shape from the prior (exp(1.0))

shapes = rexp(100, 1.0);
estimate = new ArrayList();

Newx, we set up a model to draw samples from

data = new Alignment(
		sequence=new Sequence(taxon="human",value="?"),
		sequence=new Sequence(taxon="bonobo",value="?"),
		sequence=new Sequence(taxon="chimp",value="?")
	);
tree = new beast.util.TreeParser(newick="(human:0.2,(chimp:0.15,bonobo:0.15):0.05)", taxa=data, IsLabelledNewick=true);
hky = new HKY(kappa="5.0", frequencies=new Frequencies(data=data));
clockmodel = new beast.evolution.branchratemodel.StrictClockModel("1.0");

For each of the shape values (shape0 in the following), we set up a site model with gamma shape parameter

	sitemodel = new SiteModel(gammaCategoryCount=4, substModel=hky, shape=""+shape0);

Then, we specify which XML analysis, (we prepared in the previous blog) we want to use to analyse the generated alignment, using

	mergewith = new beast.app.seqgen.MergeDataWith(template="analysis.xml", output="analysis-out.xml");

Now, we have all the components ready to set up the sequence simulator:

	sim = new beast.app.seqgen.SequenceSimulator(data=data, tree=tree, sequencelength=10000, outputFileName="gammaShapeSequence.xml", siteModel=sitemodel, branchRateModel=clockmodel, merge=mergewith);
	sim.run();

This produces gammaShapeSequence.xml and merge it with analysis.xml to get analysis-out.xml. Now we can run the analysis using:

	mcmc = (new XMLParser()).parseFile(new File("analysis-out.xml"));
	mcmc.run();

After this finished in a minute or so, we grab estimates from the analysis using the LogAnalyser, and store it in the estimate list.

	log = new LogAnalyser(new String[]{"SequenceSimulator.log"}, 2000, 10);
	s = log.getMean("gammaShape");
	estimate.add(s);

After we have done this for all generated shape parameter values, we can draw a scatter plot and save to “Sample_Chart.png”, using

p = new Plot(x=shapes, y=estimate, title="Gamma shapensimulation", xAxisTitle="original", yAxisTitle="estimate", chartType="Scatter", isYAxisLogarithmic=true, isXAxisLogarithmic=true, output="png");

This analysis just overwrites log files for each generated alignment. To tell BEAST to overwrite, we need

Logger.FILE_MODE = beast.core.Logger.LogFileMode.overwrite;

Furthermore, we want to use BEAGLE, but dependeing on your hardware, this may not speed things up. Setting BEAGLE flags can be done like so:

beagleFlags = beagle.BeagleFlag.VECTOR_SSE.getMask() | beagle.BeagleFlag.PROCESSOR_CPU.getMask();
System.setProperty("beagle.preferred.flags", Long.toString(beagleFlags));

Running the analysis

So, that gives us the following complete script.

// This script demonstrates a simulation study for the
// shape parameter in the gamma rate heterogeneity model.
// Requirements: the file analysis.xml must be in the directory
// from where this script is run.

import beast.evolution.substitutionmodel.*;
import beast.evolution.sitemodel.*;
import beast.evolution.alignment.*;
import beast.util.*;
import beast.core.*;
import com.xeiam.xchart.*;
import beast.app.shell.*;

Logger.FILE_MODE = beast.core.Logger.LogFileMode.overwrite;

// set up flags for BEAGLE -- YMMV
beagleFlags = beagle.BeagleFlag.VECTOR_SSE.getMask() | beagle.BeagleFlag.PROCESSOR_CPU.getMask();
System.setProperty("beagle.preferred.flags", Long.toString(beagleFlags));

// draw gamma shape from the prior (exp(1.0))
shapes = rexp(100, 1.0);
estimate = new ArrayList();

// set up model to draw samples from
data = new Alignment(
		sequence=new Sequence(taxon="human",value="?"),
		sequence=new Sequence(taxon="bonobo",value="?"),
		sequence=new Sequence(taxon="chimp",value="?")
	);
tree = new beast.util.TreeParser(newick="(human:0.2,(chimp:0.15,bonobo:0.15):0.05)", taxa=data, IsLabelledNewick=true);
hky = new HKY(kappa="5.0", frequencies=new Frequencies(data=data));
clockmodel = new beast.evolution.branchratemodel.StrictClockModel("1.0");

k = 0;
for (shape0 : shapes) {
	sitemodel = new SiteModel(gammaCategoryCount=4, substModel=hky, shape=""+shape0);
	//sim = new beast.app.seqgen.SequenceSimulator(data=data, tree=tree, sequencelength=10000, outputFileName="gammaShapeSequence.xml", siteModel=sitemodel, branchRateModel=clockmodel);
	// produce gammaShapeSequence.xml
	//sim.run();
	
	mergewith = new beast.app.seqgen.MergeDataWith(template="analysis.xml", output="analysis-out.xml");
	sim = new beast.app.seqgen.SequenceSimulator(data=data, tree=tree, sequencelength=10000, outputFileName="gammaShapeSequence.xml", siteModel=sitemodel, branchRateModel=clockmodel, merge=mergewith);
	// produce gammaShapeSequence.xml and merge with analysis.xml to get analysis-out.xml
	sim.run();

	// run the analysis
	mcmc = (new XMLParser()).parseFile(new File("analysis-out.xml"));
	mcmc.run();

	// grab estimate from the analysis
	log = new LogAnalyser(new String[]{"SequenceSimulator.log"}, 2000, 10);
	s = log.getMean("gammaShape");
	print("iteration: " + (k++) + " shape = " + shape0 + " estimate = " + s);
	estimate.add(s);
}

// create scatter plot and save to /tmp/Sample_Chart.png
p = new Plot(x=shapes, y=estimate, title="Gamma shapensimulation", xAxisTitle="original", yAxisTitle="estimate", chartType="Scatter", isYAxisLogarithmic=true, isXAxisLogarithmic=true, output="png");

You can run the analysis in BEASTStudio, but you can also run it from the command line, which is probably a bit faster. BEASTShell has a command line interpreter that can be started with

java -cp beast.jar:bsh.jar bsh.Interpreter examples/simstudy.bsh

Once you ran the script, something similar to the following image should appear in the file Sample_Chart.png.

Looks like the shape parameter can be fairly reliably recovered from a large range of shape values. Only at the extremes — below 0.05 and over 15 — the prior is drawing the estimate to the mean.

Introducing BEASTShell

26 May 2014 by Remco Bouckaert

BEASTShell is a scripting language based on BeanShell 2.2 which itself is based on BeanShell. The goal of BeanShell is to provide a scripting environment supporting Java, and consequently its syntax is very much like Java. The main difference is that it is a scripting language, which means we get dynamic typing. Furthermore, there is an interactive interpreter, so you can type things like

bsh % 3+4;

bsh % print("Hello world!"); // print() is a BEASTShell command
Hello world!
bsh % "Hello world!";

bsh % x = 1 + 2 + 3 + 4;

bsh % for (i = 0; i < x; i++) 
		print(i);
0
1
2
3
4
5
6
7
8
9
bsh % 

Here bsh % is the prompt (which you can customise), and the remainder is output to the console. Simple expressions produce the result on the console if show() is on — which it is by default. The second line is the canonical hello-world program, which is quite a bit shorter than what you would need in Java! It can even be shortened to
"Hello world"; since the console print the value of expressions on screen, and the value of "Hello world"; is a String with its familiar content as value.

Note how we use print as a command. Commands are pre-defined functions that come from script files in the class-path. BEASTShell has many such commands, but before we dive in, let’s first install BEASTShell.

Installing BEASTShell

BEASTShell is a BEAST package, so to run BEASTShell you need to install BEAST first (available here). Then, you need to install the BEASTShell package. Start BEAUti and select the menu File/Manage Packages and a window pops up where you can select the BEASTShell package and click the “Install” to install the package. It is about 4MB at the moment, which may need a bit to get downloaded, so it may take a little time for the package to become available.

BEASTStudio

BEASTStudio is a basic IDE for BEASTShell and is probably a good starting point to get familiar with BEASTShell. There are many other ways to run BEASTShell scripts, including in a text-only console, in programs, as servlet, etc., but BEASTStudio is the easiest to get started. There is lots of help, demos and documentation, as well as editors with syntax colouring, a history of everything in the console and a variable inspector showing all available variables and their values. So, there is lots of interactive feedback when exploring BEASTShell programs.


BEASTStudio requires JavaFX

BEASTStudio relies on JavaFX, which means you need to run Java 7 or better, (or install JavaFX separately for Java 6, which only appears
to work on windows
). If you run Java 8, JavaFX is loaded automatically, and you do not need to worry about it. If you run Java 7, it depends on the update whether it loads JavaFX or not.

Regardless, BEASTStudio attempts to load JavaFX if it is not already loaded as follows:

  • If the JAVA_HOME environment variable is defined, it attempts to load $JAVA_HOME/jre/lib/jfxrt.jar
  • If that fails, if looks for the JAVAFX_JAR environment variable
    and attempts to load JAVAFX_JAR. So, if you specify JAVAFX_JAR=/usr/java/lib/jfxrt.jar then BEASTStudio attempts to load /usr/java/lib/jfxrt.jar.
  • If both of the above fail, it tries to load from /opt/java/jre/lib/jfxrt.jar.

If none of the above succeed, BEASTStudio will fail with an error message.

Running BEASTStudio

To start BEASTStudio, open the AppStore in BEAST and when BEASTShell is properly installed there should be an entry for BEASTStudio. Double click the icon, or select and click “launch” and BEASTStudio should display itself after a few seconds. If it does not, but the splash screen does, some libraries (e.g. JavaFX) may be missing.

Creating BEASTObjects

One of the main difference of BEASTShell is in how it treats classes that are derived from the BEASTObject class. To create a BEASTObject in Java requires calling the constructor of the object, initialising each of its inputs then
calling initAndValidate(). BEASTShell does these three steps in one single statement, for example,

import beast.evolution.alignment.*;
human = new Sequence(taxon="human", value="?"),

is the BEASTShell equivalent of

import beast.evolution.alignment.*;

... {
Sequence human = new Sequence();
human.taxonInput.setValue("human", human);
human.dataInput.setValue("?", human);
human.initAndValidate();
}

Note that the name-value pairs in creating the BEASTObject — these are independent of the order. If you leave them out, the order of inputs is used (you can check by showing the BEAST documentation with ?Sequence), which is more error prone since it can change in the future. Value do not necessarily need to be primitive values, you can use more complex objects as well. For example, a two sequence alignment can be created using

human = new Sequence(taxon="human", value="?"),
chimp = new Sequence(taxon="chimp", value="?"),
data = new Alignment(sequence=human, sequence=chimp);

Calculating tree statistics

One of the things we hoped to make easier (see previous post) is to calculate statistics on trees, such as the length of a tree. We can define the length of a tree for example like so

len(node) {
  if (node.isLeaf()) {
    return node.getLength();
  else 
    return len(node.getLeft()) + len(node.getRight()) + node.getLength();
}

// to test the len method, create a tree
tree = new beast.util.TreeParser(newick="(1:0.2,(2:0.15,3:0.15):0.05)");
len(tree.getRoot());
// returns 0.55

This implementation recurses through the (presumed binary) tree with just a few lines of code. It also demonstrates how to create a tree using the TreeParser BEASTObject. If import beast.util.*; was inserted at the start, the even been shorter tree = new TreeParser(newick="(1:0.2,(2:0.15,3:0.15):0.05)"); would be sufficient.

If the tree is not binary, we can use the following for non-binary trees:

// implementation that recurses through the (potentially non-binary) tree
len2(node) {
  if (node.isLeaf()) {
    return node.getLength();
  } else {
    len = node.getLength();
    for (child : node.getChildren()) {
      len += len2(child);
    }
    return len;
  }
}

len2(tree.getRoot());
// still returns 0.55
// now define a non-binary tree
tree2 = new beast.util.TreeParser(newick="(1:0.2,((2:0.1):0.1))", singlechild=true);
len2(tree2.getRoot());
// returns 0.40

An alternative implementation that loops over the nodes in just 4 lines of code:

len3(tree) {
  len = 0;
  for (node : tree.getNodesAsArray())
      len += node.getLength();
   return len;
}

len3(tree);
// returns 0.55
len3(tree2);
// returns 0.40

Getting Help

The parser recognises lines starting with question marks as cries for help. A single question mark followed by an expression brings up help on the expression (in BEASTStudio this is shown in the help panel). A double question mark followed by an object or class shows public fields and methods for that object or class (again, in the help panel when running BEASTStudio).

To get help on a command, use help(“cmd”); of alternatively ?cmd e.g.

bsh % help("print");
bsh % ?print
bsh % help("dnorm");
bsh % ?dnorm

To get help on a BEASTObject, use help(BEASTObject); e.g.

bsh %  ?beast.core.MCMC
or, if you already created an MCMC object, asking help for the object will have the same results:
bsh % tree = new beast.evolution.tree.Tree()
bsh % ?tree
bsh % javap(tree)
bsh % ??tree

To get help on any other class, use help(Class); e.g.

bsh %  help(java.util.ArrayList);
bsh %  ??java.util.ArrayList;
bsh %  data = new ArrayList();
bsh %  ?data

Running demos

There are a few demos that show off capabilities of BEASTShell. To list the set of demos, use demo();. There are four demos at the moment of writing:

  • beanshell: a quick primer on BeanShell syntax
  • chart: demonstrates various 2D charts x
  • trace: demonstrates how to interactively inspect traces
  • trees: demonstrates various trees and how to display them

To run a demo, use demo(demoname); e.g. demo("chart"); to start the chart-demo.

BEASTShell commands

There is already a large number of commands that come with BEASTShell, divided into three categories:

  • BEAST commands which are mostly specific to BEAST.
  • BeanShell commands which are inherited from BeanShell. Some commands are deleted or adjusted for BEASTShell.
  • Math, statistical and utility functions for general purpose usage.

These are the BEAST commands (at present):

demo demonstrate some BEASTShell capabilities in BEASTStudio
help provide online help
c construct a list of objecst, e.g. x=c(1,1.5,2,2.4)
assertEquals handy for testing, e.g. assertEquals(dbeta(0.4, 5, 1, false), 0.128, 0.0001);
beast start a BEAST run
beauti start a BEAUti session
appstore start the BEAST AppStore
requires indicate some BEAST package is required, and install if not present.
trace plot trace and show statistics of a BEAST trace file.
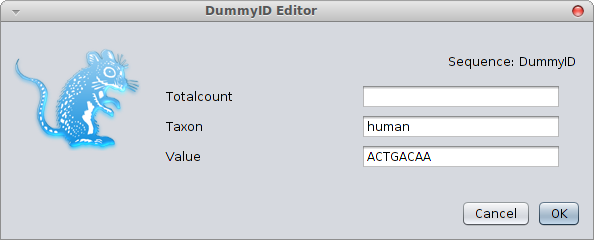
edit edit BEASTObject through a dialog.
plot plot component to plot panel or to file.
regression calculate regression line through a series of points.

The BeanShell commands are mostly commands for starting scripts and performing shell-like functions. From the BeanShell documentation, these are a few useful commands:

  • source(), run() – Read a bsh script into this interpreter, or run it in a new interpreter
  • frame() – Display a GUI component in a Frame or JFrame.
  • load(), save() – Load or save serializable objects to a file.
  • cd(), cat(), dir(), pwd(), etc. – Unix-like shell commands
  • exec() – Run a native application
  • javap() – Print the methods and fields of an object, similar to the output of the Java javap command.
  • setAccessibility() – Turn on unrestricted access to private and protected components.

The over 125 math and stat commands are inspired by R’s stats and base package, and include things like rnorm to generate random numbers from the normal distribution, max to get the maximum of a list of numeric objects, or an array of objects, sum to sum a list or array of numbers, etc.

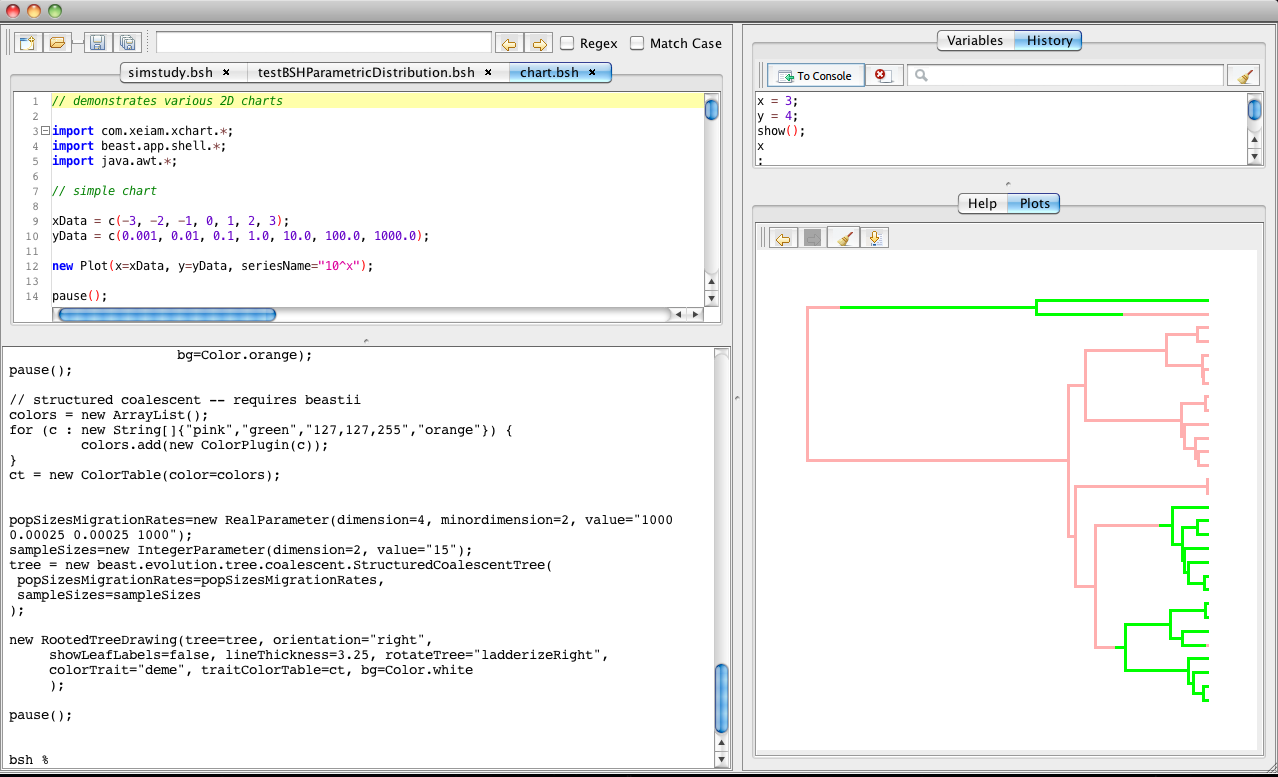
Graphs and tree-plots with BEASTStudio

BEASTShell contains a number of classes for 2D-charting and drawing trees. A few examples are shown below. To create a plot, use the beast.app.shell.Plot class. You can add various series to a plot using the beast.app.shell.Series class. For more information and options available for plots, use the help command

?beast.app.shell.Plot
?beast.app.shell.Series

Also, check out the code used in the chart-demo.

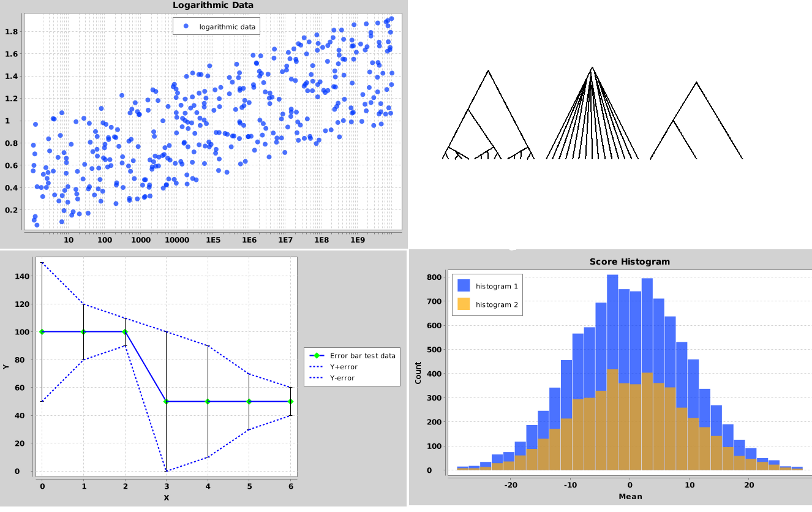
To create plots of trees, check out the classes beast.graphics.RootedTreeDrawing for single rooted trees, beast.graphics.UnrootedTreeDrawing for unrooted trees and beast.graphics.TreeDrawingGrid to draw multiple trees on a single plot.

All of the classes mentioned here will produce output in the plot-pane of BEASTStudio when new objects of them are created.

Learning more

The best way to learn more is to run the demos — read the output on the console while running the demo. Read the documentation and browse the help screen in BEASTStudio.

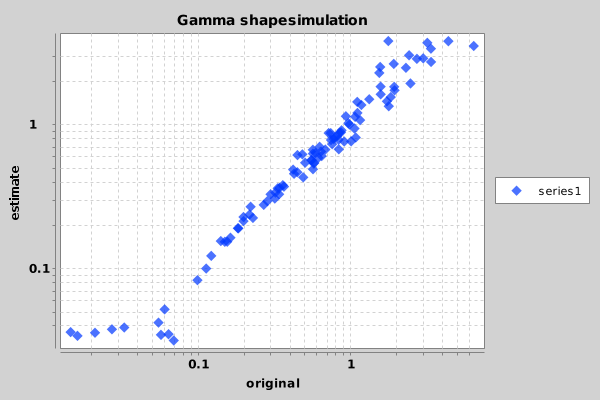
Next week, we will have a look on how to perform the simulation study we did before, but with much less hassle using BEASTShell.

What is new in BEAST v2.1.3 and its packages

12 May 2014 by Remco Bouckaert

The main reason for this release is to fix bugs in BEAUti for *BEAST — previously, the NodeReheight operator did not get assigned any gene trees. As a consequence, the topology of the species tree did not change (much) in an analysis produced by BEAUti 2.1.2. Further, when a calibration with timing information is placed on the species tree in BEAUti, all clock rates of gene trees in the analysis should be estimated. By default, one of the genes has its clock rate fixed to one, while the remaining genes have their clock rate estimated. BEAUti now ensures the clock rate of all genes are automatically set to estimated (if the mode/automatic set clock rates is checked, which it is by default). A regression test was added to the code ensuring that the *BEAST tutorial (as well as the other two tutorials) produces the numbers as expected.

An AppStore application is added that can be started by double clicking the AppStore icon, just like one would start BEAST or BEAUti. The AppStore makes it easy to start applications defined in packages, such as the TreeSetAnalyser in SNAPP for producing statistics from tree files produces in a SNAPP analysis. Starting package applications otherwise would involve cumbersome setting up of class paths from the command line.

Fasta file imported were mostly classified as datatype of amino acid when imported into BEAUti. Now, the file extension is used (.fna = nucleotide), and a smarter patter matching rule applied to detect whether the type is nucleotide instead of amino acid.

When using the log normal distribution in a prior in BEAUti it now displays the distribution properly in the chart.

When an MRCA prior is put on a clade, and it is selected as monophyletic the proportion of the time the clade is monophyletic used to be part of the log file and get stuck at 1. With many such priors, displaying these in Tracer caused clogging. Now, this statistic is not logger any more.

The upgrade button in the PackageManager now actually upgrades a package.

BEASTShell, a package for scripting BEAST, is under heavy development and an very early release is already available (see details).