SNAPP treats each SNP as having its own gene tree, but what happens when there is data missing for some sites for a SNP? SNAPP simply assumes these taxa do not exist in the gene tree. If you have a species containing 3 lineages for which one has missing data, SNAPP assumes there is a gene tree with only 2 lineages for that species. So, what happens when all 3 lineages is missing? Previous versions of SNAPP (v1.1.5 and before) could not handle this situation and just removed these sites from the data. This can be a problem when you do species delimitation using BFD*; when you split a species and data is missing, some sites may be deleted that are not deleted when doing the un-split analysis. As a results, marginal likelihoods are calculated for different data sets, so these are not comparable. In v1.1.6, no sites with missing data are deleted any more, even when this leaves some species having zero lineages. SNAPP assumes the gene tree simply has no taxa in that species any more.
Another change in SNAPP v1.1.6 is that it uses the MCMC class from BEAST instead of SNAPP, which means there is no timeout and sampling from prior options any more, but this makes doing a path sampling analysis a lot easier.
First, make sure you have SNAPP at least v1.1.6 installed and Model Selection v1.0.2. Open the package manager (in BEAUti under the File/Manage packages menu) and select SNAPP, then click the Install button. After a little while a warning pops up that SNAPP is installed, and you might need to restart BEAUti to be able to set up a SNAPP analysis.
Then, select the SNAPP template, to set up a SNAPP analysis.
Click import data, and select a nexus file with your alignment. The taxa will automatically be assigned to a species by guessing based on the lineage names in the nexus files. You can change this of course.
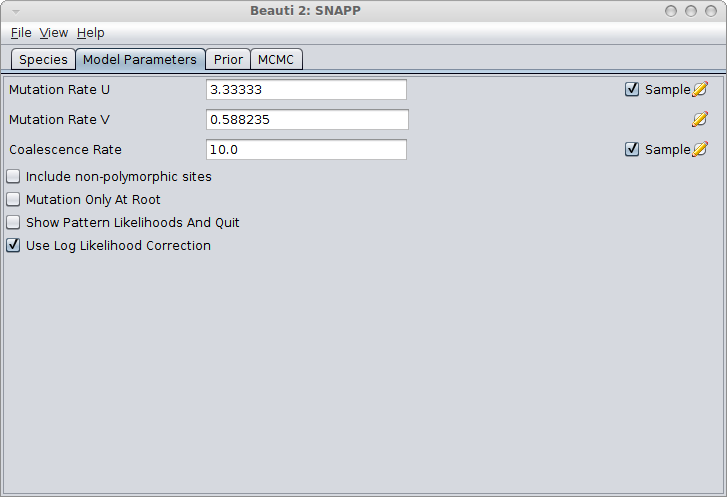
In the Model Parameters panel, make sure you either calculate the values for u and v (see the Rough guide to SNAPP how to do this) or just click the estimate flag next to Mutation Rate U. When there is a sufficient amount of SNP data the estimates for U and V converge quite rapidly most of the time. Note: Leaving the default values for u and v and not estimating these mutation rates is almost surely going to lead to bad fits!
You can save this analysis as XML file, say runA.xml and run it with BEAST.
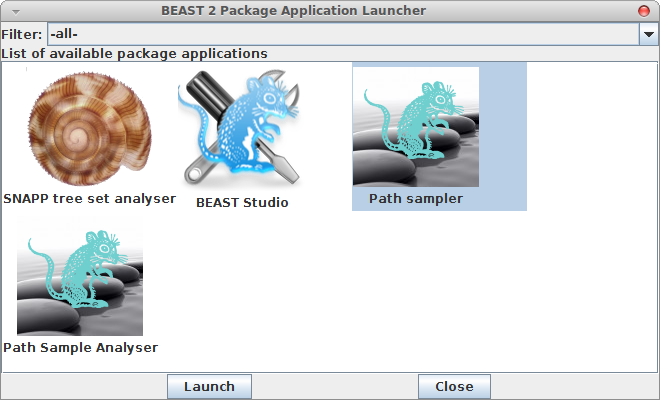
Now, if you want to calculate the marginal likelihood, you can start the AppStore application that is part of BEAST, and select the Path Sampler icon — either double click or click launch to start the Path sampler.
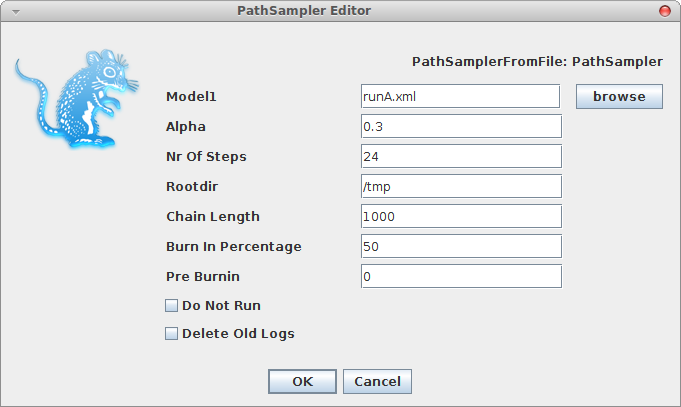
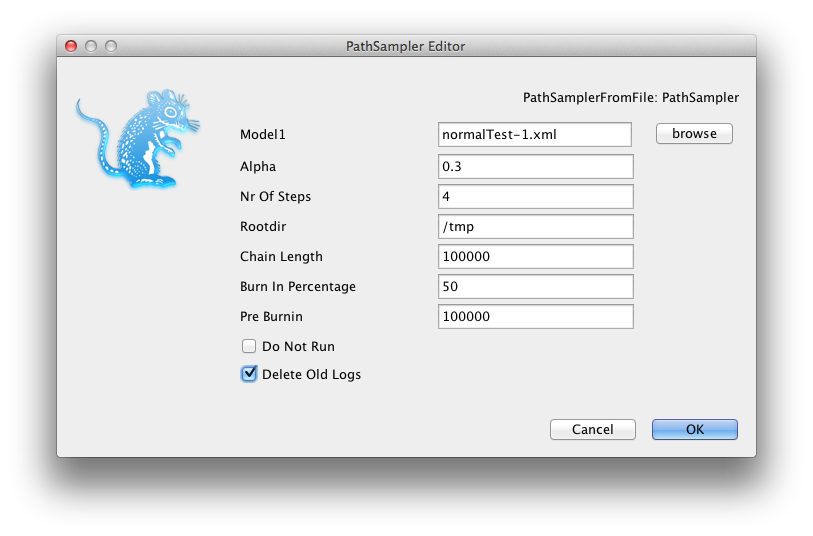
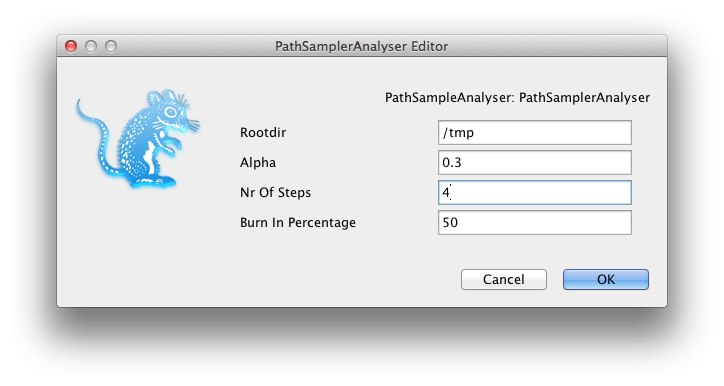
A window pops up where you can select the XML file you save from BEAUti and specify the parameters for the path sampling analysis.
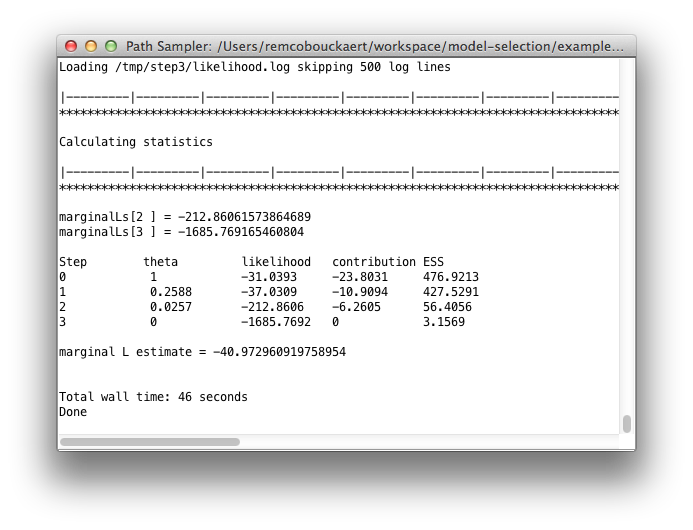
Once you click OK, the path sampling analysis is set up and run in a separate window, where after a little (or long — depending on the data) while the marginal likelihood will be printed.
Requires the model-selection package version 1.0.2 or better. See here how to manage packages.
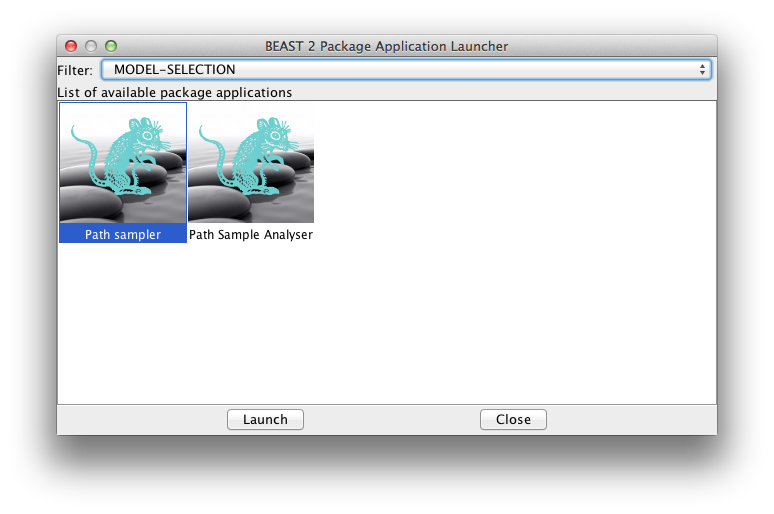
Instead of editing the XML, as explained in the BEAST website, a path sampling, or stepping stone analysis can be set up using a GUI as well. First, launch the appstore — there should be an icon labelled ‘AppStore’ when BEAST is installed, just double click that.
When you filter applications on MODEL-SELECTION using the drop-down box at the top of the AppStore, there should be an icon labelled Path Sampler and another labelled Path Sample Analysis. Launch the Path Sampler by double clicking the icon.
A dialog pops up showing a range of options for setting up the path sampling or stepping stone analysis. As you can see, one of the inputs called Model1 is the XML file containing the BEAST analysis for which you want to estimate the marginal likelihood. Here we selected normalTest-1.xml which is in the examples directory of the MODEL-SELECTION package.
Set the other parameters as appropriate. Note that in this screen-shot we chose 4 steps just to ran it fast, but that does not mean that 4 steps is sufficient. You want to keep increasing the number of steps till the marginal likelihood estimate remains constant. There is no rule of thumb other than this to find the number of steps as far as I know.
If you already ran a path sampling analysis before, you want to overwrite the log files, and click the “Delete old logs” check box.
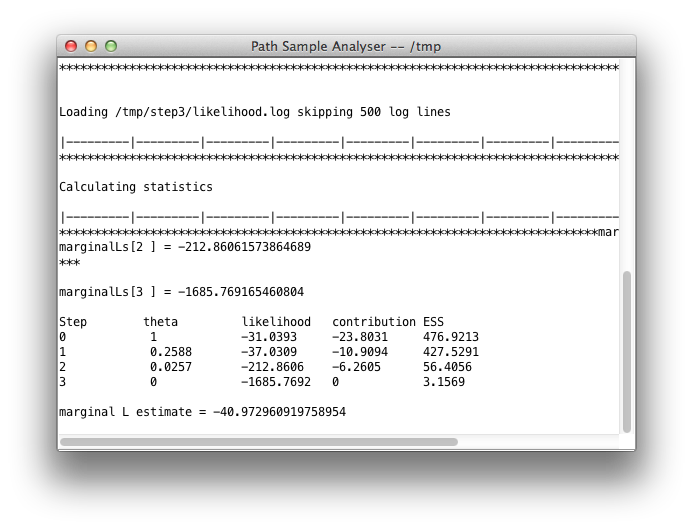
Once you click OK, the analysis is started (if you left the Do Not Run check-box unchecked) and a window pops up showing progress of the analysis. At the end, the marginal likelihood estimate is printed:
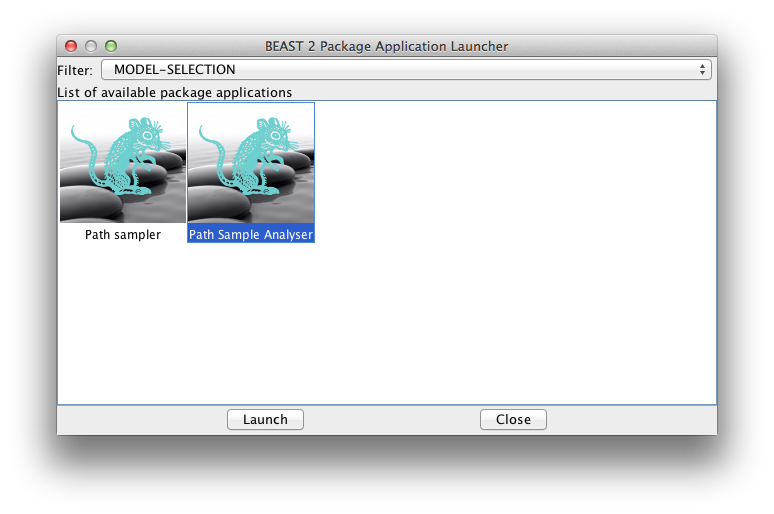
If you selected “Do not run”, all files and directories will be created, but the analysis is not run yet. You can run them by kicking of the run.sh/run.bat scripts (depending on your operating system). Once the analysis is run — or for some steps re-run if something went wrong — you need to start the path-sample analyser to calculate the ML estimate from the individual steps. This is easy — from the AppStore launch the path-sampling analyser:
A window pops up where you can specify the same path sampling parameters as used for the analysis:
When you click OK, a window pops up where after a little while the marginal likelihood estimate is printed:
Suppose you have 3 genes and know the rate of one of the genes. How do you set up an analysis in BEAUti?
We call the genes gene1, gene2 and gene3, and the rate is say 2.3 substitutions per site per million year. There are a number of things you can do:
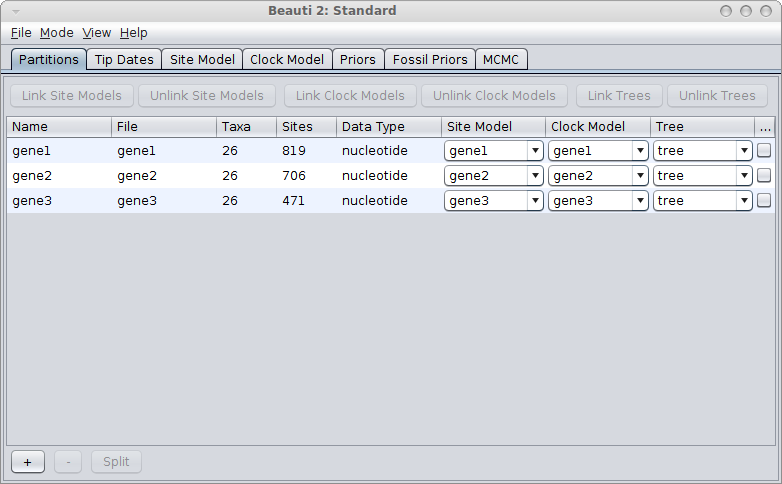
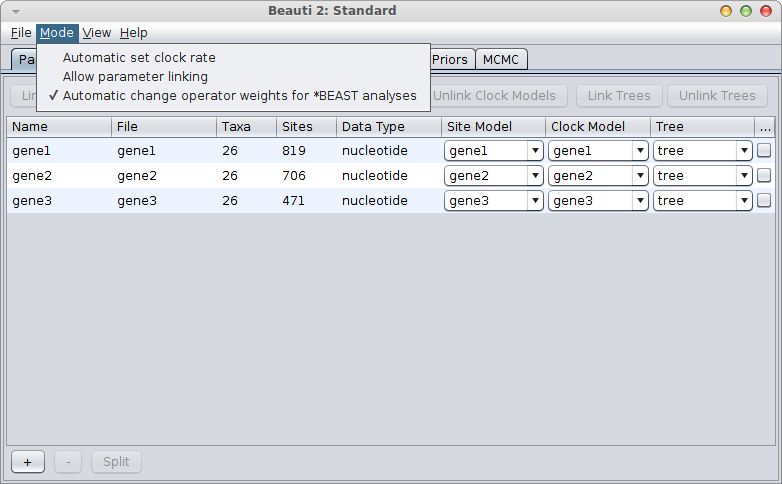
Linked genes
If the genes are linked, for example, because they are all mitochondrial genes, you would use a single tree for all genes. Link trees for all partitions in the partition panel in BEAUti, and it should look something like this:
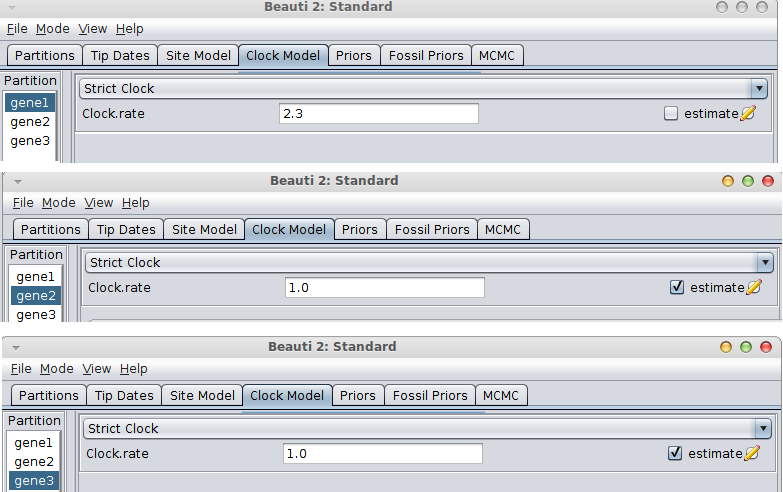
If the rate is known for the first gene, go to the Clock model tab, fill in the clock rate for the gene you have a rate for and BEAUti conveniently fixes the rate for that partition and marks the others as estimated.
If the gene with the known rate is not the first partition, you have to uncheck the “Mode/Automatic set clock rates”.
Then go to the clock model panel, where you can set the estimate box for each of the genes you want to estimate and uncheck it for the gene with the known rate.
Independent genes
If all three genes are unlinked, use a *BEAST analysis where you have an independent gene tree for each of your genes. Essentially, the same scenario for clock rates as for the single tree applies.
Semi-independent genes
You can have a mixture of the above scenarios when two genes are linked and one is independent of the two, say, when two genes are mitochondrial and one nuclear. Then, a *BEAST analysis is more appropriate, with two gene trees — one for the linked genes and one for the other.
Uncertainty: rate = 2.3 ± 0.25
Often, there is some measure of uncertainty for the known rate, so instead of 2.3, we find 2.3 ± 0.25 in the literature. Then, it would be more appropriate to estimate the known clock rate as well, and put a strong prior on that clock rate. In this case, you want to uncheck the “Mode/Automatic set clock rates” menu and make sure all clock rates have their “estimate” box ticked in the clock model panel. You set the clock-rate prior in the priors panel.
It is tempting to interpret a rate estimate of 2.3 ± 0.25 as a normal distribution with mean of 2.3 and a 95% confidence interval of [2.3-0.25, 2.3+0.25] = [2.05, 2.55]. However, the problem with a normal distribution is that its range includes negative values. In general, if the mean is more than 4 standard deviations away from zero, this can be reasonable, since less than 0.006% of the probability mass is below zero.
What is wrong with the normal prior?
Even then it is still possible that during the MCMC, the clock rate may become zero (or even negative) and there is no indication from the prior that this is not allowed. This can happen because other priors interact with the rate prior. In particular, the tree priors (e.g. a coalescent when there are enough taxa) can strongly guide the height of the tree, and thus interact with the rate prior. The tree prior should be conditioned on the rate calibration (prior = P(tree|calibration) * P(calibration)), but in BEAST we generally assume (incorrectly) priors are independent (prior = P(tree) * P(calibration)), because we do not know how to do the conditioning. This means, unfortunately, that this interaction is not obvious when sampling from the prior, and when inspecting the trace it seems we are sampling from the normal rate prior that we specified. Only when sampling from the posterior, both priors try to influence the height of the tree, and start interacting with each other.
So, if you insist on using a normal distribution, you must verify that the rate is distributed according to your prior (by inspecting the trace file in Tracer) and the rate does not contain zero or negative values. (You could ensure that the rate remains positive by setting a lower bound on the clock rate).
Use a log-normal prior!
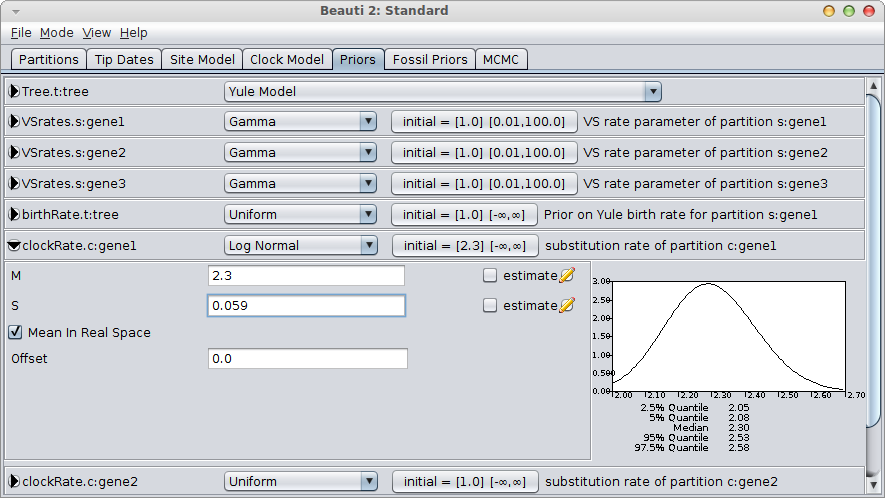
A much better alternative is to use a log-normal prior, which has a range over the positive numbers only. For small values of the standard deviation, it is shaped like a bell-curve. Just like the normal distribution, it only requires two parameters to specify, but requires no lower bound to be set on the rate, since negative values are automatically out of range.
It is easy to configure the log-normal prior in BEAUti, by setting the mean “M” to 2.3, check the “Mean in real space” box (as opposed to in log space) and set the standard deviation “S” by matching the 95% interval to [2.05, 2.55]. This means matching the 2.5% quantile to 2.05 and the 97.5% quantile to approximately 2.55. A bit of fiddling with the numbers shows that S=0.059 is a reasonable match.
You still want to verify that the rate is distributed according to your rate prior (by inspecting the trace file in Tracer) and is not influenced by the tree prior too much.
Multi-line strings have always been a bit cumbersome in Java. Either you have to add strings in quotes separated by a + sign, like so:
	String s = "This is a multi-linen" +
		"string that takes a lot of quotesn"+
		"and escape characters";
	String [] parts = s.split("n");
or use a StringBuilder and append every string like so:
	String s = new StringBuilder().append("This is a multi-linen").
		.append("string that takes a lot of quotesn").
		.append("and escape characters").toString();
	String [] parts = s.split("n");
which is even more verbose. Perl supports multi-line strings and the above simplifies to
perl % $s = 'This is a multi-line
string without very much need
for extra escape characters';
perl % @parts = split('n', $s);
There is a proposal by Stephen Colebourne to incorporate multi-line strings into Java, but ala, so far that never made it (we are at Java 8 now). Fortunately, hidden in the parser, and absent from the documentation, there is this little gem which tells we can have multi-line strings in BEASTShell. The escape sequence is “””, so the Perl fragment in BEASTShell would be
bsh %  s = """This is a multi-line
string without very much need
for extra escape characters""";
bsh %  parts = s.split('n');
which is just one characters more than the Perl script! If you want quotes inside the multi-line string, no escape sequence is necessary, just insert them in the string:
bsh %  s = """Darwin's Finches
Homo "Sapiens"
Double quote=""""";
bsh %  parts = s.split('n');
// parts is now [Darwin's Finches, Homo "Sapiens", Double quote=""]

bsh %  s = """Darwin's Finches
Homo "Sapiens"
Single quote="""";
bsh %  parts = s.split('n');
// parts is now [Darwin's Finches, Homo "Sapiens", Single quote="]
(which surely upsets the code colouring algorithm:-)) For triple quotes you still need to add two strings
bsh % s = """Darwin's Finches
Triple quote=""""" + """;
bsh %  parts = s.split('n');
// parts is now [Darwin's Finches, Triple quote="""]
but, he, would needs that?
The ugliness of regular expressions
Another eye-sore is Java syntax is regular expression handling. Look at this fragment, almost completely from the Java documentation:
import java.util.regex.Pattern;
import java.util.regex.Matcher;

public class MatcherDemo {

    private static final String REGEX = "\bdog\b";
    private static final String INPUT = "dog dog dog doggie dogg";

    public static void main(String[] args) {
       Pattern p = Pattern.compile(REGEX);
       //  get a matcher object
       Matcher m = p.matcher(INPUT);
       int count = 0;
       while(m.find()) {
           count++;
           System.out.println("match " + count + " = " + INPUT.substring(m.start(), m.end()));
      }
   }
}
(The original code in the documentation prints the m.start() and m.end(), but why would one be interested in the location instead of the matching string?) The equivalent in BEASTShell would be a bit shorter:
import java.util.regex.Pattern;
import java.util.regex.Matcher;

REGEX = "\bdog\b";
INPUT = "dog dog dog doggie dogg";

p = Pattern.compile(REGEX);
//  get a matcher object
m = p.matcher(INPUT);
count = 0;
while(m.find()) {
   count++;
   print("match " + count + " = " + INPUT.substring(m.start(), m.end()));
}
But in Perl this can be done even shorter:
$REGEX =  "\b(dog)\b";
$INPUT =  "dog dog dog doggie dogg";

$count = 0;
while ($INPUT =~ /$REGEX/g) {
	$count++;
    print("match $count = $1n");
}
Gedit counts these fragments as follows
#words
#characters
#characters
without whitspace
Java
68
400
548
BeanShell
46
262
313
Perl
22
120
151
In summary, regular expressions in Java and — to a lesser extent — BEASTShell are very verbose and ugly.
Improved regular expressions
BEASTShell has a regexp command that returns a list of matches, which can be used like so:
This is of course a bit cheating, because we can hide any complex function inside a command. But I think this is justified here since regular expression matching is common enough and verbose enough in Java/BeanShell that a few extra commands are very helpful. Also, it shows how an effectively defined command can help streamline your scripts.
Filter *BEAST analysis
Let’s put this to work to select a set of species taxa in an existing *BEAST analysis. First, define the original species and their sequences.
// the original species and their sequences
s="""Cyanocorax_mystacalis = {GU144828 GU144829 GU144831 GU144830}
C.validus = {JQ023974}
Urocissa_erythrorhyncha = {JQ864482}
C.capensis = {JQ023977}
Cyanocorax_yucatanicus = {DQ912613 GU144848}
Perisoreus_canadensis = {JQ655939 JQ656012 JQ656006 JQ655975} """;

// one species per entry, so we can process s line by line
data = s.split("n");

// the new set of species
filter ="""Urocissa_erythrorhyncha
Perisoreus_canadensis
Cyanocorax_yucatanicus""";
Then, we define a command to print out a new taxonset, using regexp to get info out of the string:
newtaxon(s, filter) {
	x = regexp(s, "(.*)=.*{(.*)}.*");
	//if (!filter.matches("(?s).*\b"+Matcher.quoteReplacement(x[1].trim())+"\b.*")) {
	if (!filter.matches("(?s).*\b"+x[1].trim()+"\b.*")) {
		return;
	}
	print("");
	for (id : x[2].trim().split("\s+")) {
		print("    ");
	}
	print("");
}

for (s : data) {newtaxon(s, filter);}
Assuming the original sequences are in a file called source.xml, we can grab the sequences from the file using:
newsequence(s, filter) {
	x = regexp(s, "(.*)=.*{(.*)}.*");
	if (!filter.matches("(?s).*\b"+x[1].trim()+"\b.*")) {
		return;
	}
	for (id : x[2].trim().split("\s+")) {
		exec("grep "+ id + " source.xml | grep sequence");
	}
}

for (s : data) {newsequence(s, filter);}
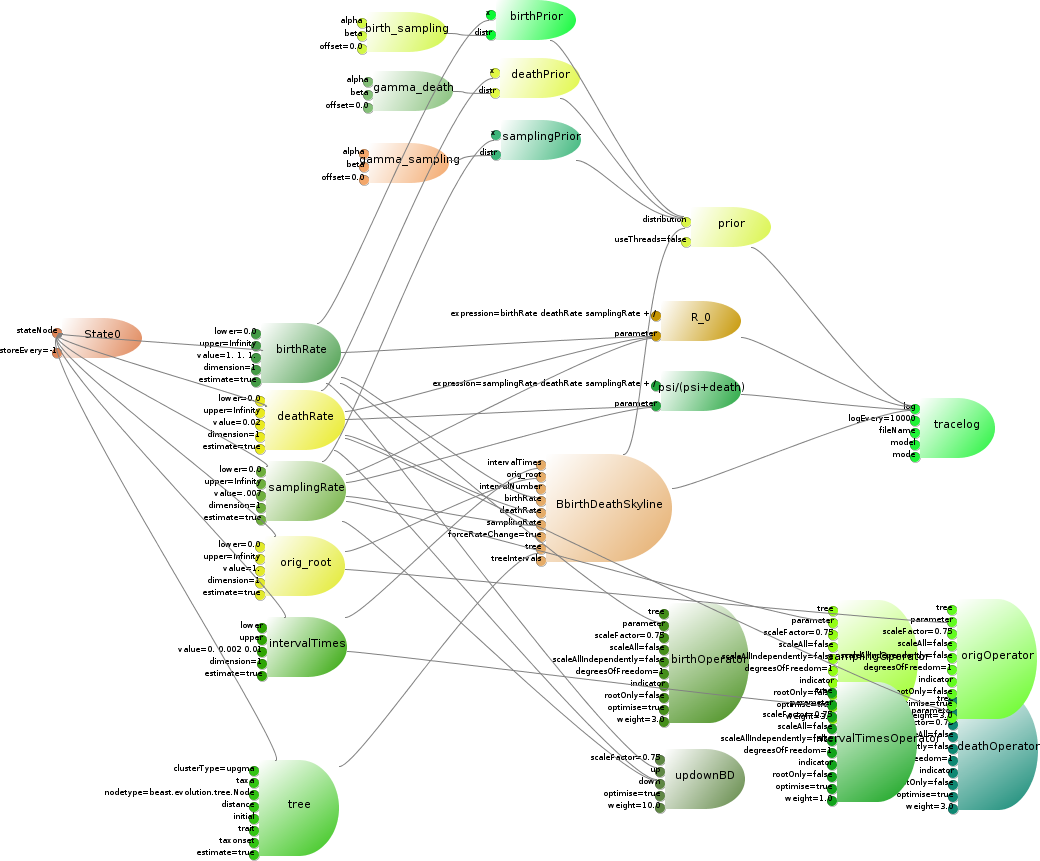
The birth-death skyline model cite{Stadler} is a tree prior that can deal with serially sampled tip dates. It can be implemented as a lean CalculationNode, which takes a set of five parameters that can be estimated as input, plus an input for the number of intervals in the skyline model. The birth and death rate, and the sampling rate have gamma priors on them, and there are a few functions of the parameters we want to log. The complete model is illustrated in below. The parameters, tree, operators, priors and loggers are already available in BEAST. The loggers use the RPNcalculator class to calculate a simple arithmetic function of the parameters. This only leaves code to be developed for the details of the birth-death skyline model itself.
The Birth-Death Skyline model consists of a tree prior, six parameters, a number of operators on these parameters, some priors on these parameters, two specialised loggers, and a set of rules to connect model, e.g., the tree to the prior, the loggers to the trace-log, etc. For clarity, the links between parameters and state are omitted as well as the links between parameters and trace-log.
Step 1: Write BEASTObject – develop code
The code was developed by Denise K”uhnert, and we will have a look at some of the more interesting areas. It starts with a proper description.
@Description("Adaptation of Tanja Stadler's BirthDeathSamplingModel, to allow for birth and death rates to change at times t_i")
The class definition starts defining the five parameter inputs and the input for the number of intervals. Further, there is a boolean input that influences the behaviour.
public class BirthDeathSkylineModel extends SpeciesTreeDistribution {
public Input intervalTimes =
        new Input("intervalTimes", "The times t_i specifying when rate changes can occur", (RealParameter) null);
...
public Input forceRateChange =
        new Input("forceRateChange", "If there is more than one interval and we estimate the time of rate change, do we enforce it to be within the tree interval? Default true", true);
Then follow the member variables for shadowing input parameters and storing intermediate results. This is a thin CalculationNode so there are no member variables for storing/restoring intermediate results.
double t_root;
int m;
protected double[] p0_iMinus1;
...
}
The initAndValidate method sets up member variables and does some sanity checks on the inputs.
@Override
public void initAndValidate() throws Exception {
    super.initAndValidate();

    m = intervalNumber.get().getValue();

    if (intervalTimes.get() != null){
        if (intervalTimes.get().getDimension() != m)
            throw new RuntimeException("Length of intervalTimes parameter should equal to intervalNumber (" + m + ")");
        timesFromXML = true;
    }
}
Then, a few hundreds of lines of code are omitted, which perform the actual calculations. The method of interest for a tree-prior is calculateTreeLogLikelihood for a tree. We refer to the actual code for details, but this is where the most interesting part of the class resides.
@Override
public double calculateTreeLogLikelihood(Tree tree) {
    m = intervalNumber.get().getValue();
	// details omitted ...
    return logP;
}
Finally, the implementation of the CalculationNode is minimal, since this is a thin CalculationNode. The methods store and restore are not even overridden, and just use the base implementation, while requiresRecalculation is the most minimal implementation possible.
To test the new BEASTObject, write JUnit tests and create an example XML file, which typically goes in the examples directory. This example file can work as a blue-print for the BEAUti template to a large extend.
Step 3: Write BEAUti template}
We will go through the BEAUti template highlighting some of the aspects. Some of the detail is omitted for brevity and replaced by `…’ . Since a BEAUti template is in BEAST XML format, we start with a BEAST 2 header. For brevity, we introduce
This prior is a tree-prior, and wherever the main template has a merge point for tree priors, this prior should be made available. mergewith is a reserved XML element name, so no spec attribute is necessary.
This is the start of the sub-template definition. Again, there is no spec attribute, but this time it is assumed that the main template has a map-element that maps the subtemplate element name to the BeautiSubTemplate class. Likewise, connect is mapped to BeautiConnector to make things more readable.
The sub-template has an id, which is used in combo-boxes in BEAUti to identify this model. The class attribute indicate that the sub-template produces a BEASTObject of this type. One task of BEAUti is to create new BEASTObjects, and connect them to an input. The way BEAUti finds potential BEASTObjects to connect an input with is by testing whether the type of an input is compatible with the type of a sub-template. If so, the sub-template is listed in the combo-box for the input in the BEASTObjectInputEditor. The mainid id identifies the BEASTObject that has the type listed in class. Note the $(n) part of the mainid attribute. A sub-template is created in the context of a partition, and wherever there is the string $(n) in the sub-template this is replaced by the name of the partition.
The sub-template starts with a CDATA-section describing the model. The order is not important, but here it was chosen to start with the five parameters that can be estimated for the model, the birth and death rates, interval times, sampling rate and original root height. Then there is an integer parameter that probably should be an integer input for the number of intervals in the skyline model. These parameters are used by the BirthDeathSkylineModel BEASTObject defined below. The BEASTObject has a tree as input, and assumes the main-template provides a tree with id Tree.t:$(n) where $(n) the partition name.
The parameters need a proper prior, defined in the following few lines.
We do not only want to log the parameters, but also a few functions of parameters, namely the sampling rate divided by the sum of death and sampling rate. The RPNcalculator is a BEASTObject that can be used to calculate simple arithmetic expressions in reverse Polish notation, which is useful for logging.
]]>
To complete the sub-template, we need to define rules for connecting the BEASTObjects defined in the CDATA-section with relevant parts of the main template. BeautiConnector specifies a BEASTObject to connect from through the srcID attribute, a BEASTObject to connect to through the targetID template and a inputName specifies the name of the input in the target BEASTObject to connect with. Finally, the connector is only activated when some conditions are met. If the connection is not met, BEAUti will attempt to disconnect the link (if it exists). The conditions are separated by the ‘and’ keyword in the if attribute. The conditions are typically of the form inposterior(BirthDeathSky.$(n)), which tests whether the BEASTObject with id BirthDeathSky.$(n) is a predecessor of a BEASTObject with id posterior in the model. Further, there are conditions of the form Tree.$(n)/estimate=true, are typically used to test whether an input value of a BEASTObject is a certain value. This is mostly relevant to test whether StateNodes are estimated or not, since if they are not estimated no operator should be defined on it, and logging is not very useful. Let’s have a look at a few connectors.
Connectors are tested in order of appearance. It is always a good idea to make the first connector the one connecting the main BEASTObject in the sub-template, since if this main BEASTObject is disconnected, most of the others should be disconnected as well. For this tree-prior, the tree’s estimate flag can become false when the tree for the partition is linked.
end{lstlisting}}
Next, connect priors on parameters to the prior BEASTObject provided by the main template.
{color{blue}scriptsizebegin{lstlisting}[language=XML,firstnumber=last,breaklines=true]
Connect scale operators, and up-down operator. Note that the up-down operator takes as input the birth, death and sampling rate, but if one of these rates is fixed by the user in BEAUti, the link should be disconnected. So, there are three rules for deciding whether these rates should be connected to the operator.
One motivation for BEASTShell is to ease the burden of writing tests for BEASTObjects. Writing tests is never much fun, but a necessary requirement to gaurantee quality of software. Writing BEASTObject tests is more cumbersome than usual because there is a division of instantiating inputs and initialising the object, which is usually done in a constructor, but in BEASTObjects requires a call to initAndValidate. Now we have the BEASTShell and can construct BEASTObjects a lot easier, it should be able to write tests with a lot less code and effort.
Constructing BEASTObjects
One way to use BEASTShell is by having a BEASTShell interpreter and just use it to construct BEASTObjects with fragments of script. For example, a unit test for the Uniform distribution may look something like this
First, create an Interpreter
final bsh.Interpreter interpreter = new bsh.Interpreter();
Now, you can use the interpreter to create BEASTObjects, e.g.
// create the BEASTObject
Uniform d = (Uniform) interpreter.eval("new beast.math.distributions.Uniform(lower=1.0, upper=2.0)");
// use the BEASTObject as in any other test
assertEquals(1.5, d.getMean(), 1e-10);
You can use the assertEquals command from BEASTShell in your test as well.
Instead of the above, we can run the same test with
// first tell the interpreter to import classes
interpreter.eval("import beast.math.distributions.*");
// create beast.math.distributions.Uniform object and test
interpreter.eval("d = new Uniform(lower=1.0, upper=2.0);" +
"assertEquals(1.5, d.getMean(), 1e-10);");
Tests in script files
If your tests become a bit more involved than just a line or two, you probably do not want to wrap the script in a Java string, where you need to escape all double quotes, and add quotes around invidual lines.
Just save the following script in a bsh file, say in file src/test/beast/shell/uniform.bsh
import beast.math.distributions.*
d = new Uniform(lower=1.0, upper=2.0);
assertEquals(1.5, d.getMean(), 1e-10);
You can create a JUnit test as per usual, and create an bsh.Interpreter to run the script, e.g, using
public class UniformTest extends TestCase {
@Test
public void testUniform() throws FileNotFoundException, EvalError {
Interpreter interpreter = new Interpreter();
File bshfile = new File("src/test/beast/shell/uniform.bsh");
interpreter.eval(new FileReader(bshfile));
}
}
However, the test.beast.shell.ShellTest class provides a test environment that makes things even easier. Just create a test-class that derives from test.beast.shell.ShellTest and create a method that returns a TestSuite, like so
public class UniformTest extends ShellTest {
public static junit.framework.Test suite() throws Exception {
return addTests("src/test/beast/shell/uniform.bsh");
}
}
The ShellTest will load TestHarness.bsh first and calls complet() defined in TestHarness.bsh — provided it gets to the end of the script. If something fails, instead of calling asserts, you can set super.test_failed = true; and ShellTest will indicate that the test did not pass.
Developing test scripts
I found that the easiest and fastest way to set up test scripts is to run tests interactively in BEASTStudio. The history records every command, and it is easy to copy and paste relevant bits of code into a script after playing with things in the console for a while.
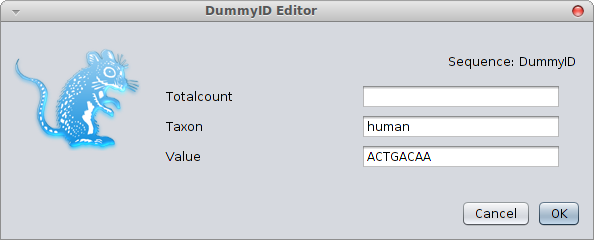
The edit() command can help creating scripts, for example for creating a sequence interactively, use
A dialog pops up where you can set values of the sequence object.
After selecting OK, the seq variable gets assigned the values entered, but also the value/name pair sequence is printed, so you can copy and paste that into any script.
BEASTShell contains a number of classes that can be customised using script fragments, similar to the beast.util.Script class in BEASTLabs that we talked about before. This means that you can create customised loggers, substitution models, clock models, and a few other classes just by changing the XML that specifies a BEAST analysis.
The following table shows the classes, all in the beast.shell package, and the functions that the script is required to specify.
Each of these classes have an input called x, which is a list of Functions. By default, the ID of a function is used as global variable in the script, but you can assign a name to a Function using the beast.shell.NamedFunction class. The following
assigns the name “param” to the value of birthRate.t:alignment, and when using the variable “param” in the script it will take on the value of birthRate.t:alignment.
Each of the script classes also have a value input, which can be used to specify a script. All inline text in an element will be passed to the value-input, which means you can put your script inside a CDATA block in the XML inside the XML element representing the script-object. For example, a BSHDistribution that is proportional to 1/X can be defined as this:
Note that to access “param”, which implements Function, we need to call Function methods, like getValue.
For BSHDistributions, we only need to specify calculateLogP, but for BSHLoggers, we need to specify three functions: init (typically used for printing the header in the trace file), log (to print a log value) and close (which for trace files means doing nothing, but for tree files an “End;” is expected). When any of these functions is not specified, an exception is thrown at the time the corresponding method is called. Likewise, an exception is thrown if there is an error in the program or any other unexpected condition is encountered.
To the following specifies a BSHLogger that reports the square of a value if its value is less than 1, otherwise it reports the value.
Here, we use a CDATA block so that we do not have to worry about escaping special characters like the < in if (param.getValue() < 1) .... Otherwise, you would have to escape those characters, giving if (param.getValue() < 1) ... making things quite hard to read. All text within the CDATA block is taken as literal text and passed to the value-input.
BEASTShell recognises some XML docment friendly tokens that are mapped on operators, so you can write if (param.getValue() @lt 1) ... instead. The full set of tokens is listed below.
token
interpreted as
@gt
>
@lt
<
@lteq
<=
@gteq
>=
@or
||
@and
&&
@bitwise_and
&
@bitwise_or
|
@left_shift
<<
@right_shift
>>
@right_unsigned_shift
>>>
@and_assign
&=
@or_assign
|=
@left_shift_assign
<<=
@right_shift_assign
>>=
@right_unsigned_shift_assign
>>>=
I prefer the CDATA block, but you know about some alternatives now. You do not need to limit yourself to the functions required by the BSH-classes, but can define any other function to be used by the script as well.
The following demonstrates usage of the BSHOperator as a scale-operator on a RealParameter:
Note how it sets the value of the parameter, which it can do only because the input is a RealParameter but may fail when other objects are used as “param”.
A few weeks ago, we had a look at a simultion study with BEAST, using the SequenceSimulator, LogAnalyser and R. Let’s do that study again, but now with BEASTShell, a package for scripting BEAST-objects. It is based on BeanShell, but has special extentions to conveniently deal with BEASTObject classes.
In the previous blog, I sampled sequences for a range of shape parameter values that seemed reasonable in my experience. However, the model assumes an exponential prior distribution over the shape parameters with mean 1, so arguably, that information is sufficient to draw shape values from. In this study, we will
sample 100 values of the shape parameter from this prior distribution,
sample an alignment with 10.000 characters using 4 gamma categories and one of the sampled shape paramter values
run the analysis on the sampled data
record the estimate of the shape parameter
create a plot of sampled against estimated shape values
Let’s get started with BEASTShell. The easiest way to create scripts is using BEASTStudio, the BEASTShell GUI. First, we import a bunch of packages we are going to need. BEASTShell already loads a nuber of packages (javax.swing.event, javax.swing, java.awt.event, java.awt,java.net, ava.util,java.io, and java.lang) which makse it easy to create standard class instances.
First, we draw gamma shape from the prior (exp(1.0))
shapes = rexp(100, 1.0);
estimate = new ArrayList();
Newx, we set up a model to draw samples from
data = new Alignment(
sequence=new Sequence(taxon="human",value="?"),
sequence=new Sequence(taxon="bonobo",value="?"),
sequence=new Sequence(taxon="chimp",value="?")
);
tree = new beast.util.TreeParser(newick="(human:0.2,(chimp:0.15,bonobo:0.15):0.05)", taxa=data, IsLabelledNewick=true);
hky = new HKY(kappa="5.0", frequencies=new Frequencies(data=data));
clockmodel = new beast.evolution.branchratemodel.StrictClockModel("1.0");
For each of the shape values (shape0 in the following), we set up a site model with gamma shape parameter
sitemodel = new SiteModel(gammaCategoryCount=4, substModel=hky, shape=""+shape0);
Then, we specify which XML analysis, (we prepared in the previous blog) we want to use to analyse the generated alignment, using
mergewith = new beast.app.seqgen.MergeDataWith(template="analysis.xml", output="analysis-out.xml");
Now, we have all the components ready to set up the sequence simulator:
// This script demonstrates a simulation study for the
// shape parameter in the gamma rate heterogeneity model.
// Requirements: the file analysis.xml must be in the directory
// from where this script is run.
import beast.evolution.substitutionmodel.*;
import beast.evolution.sitemodel.*;
import beast.evolution.alignment.*;
import beast.util.*;
import beast.core.*;
import com.xeiam.xchart.*;
import beast.app.shell.*;
Logger.FILE_MODE = beast.core.Logger.LogFileMode.overwrite;
// set up flags for BEAGLE -- YMMV
beagleFlags = beagle.BeagleFlag.VECTOR_SSE.getMask() | beagle.BeagleFlag.PROCESSOR_CPU.getMask();
System.setProperty("beagle.preferred.flags", Long.toString(beagleFlags));
// draw gamma shape from the prior (exp(1.0))
shapes = rexp(100, 1.0);
estimate = new ArrayList();
// set up model to draw samples from
data = new Alignment(
sequence=new Sequence(taxon="human",value="?"),
sequence=new Sequence(taxon="bonobo",value="?"),
sequence=new Sequence(taxon="chimp",value="?")
);
tree = new beast.util.TreeParser(newick="(human:0.2,(chimp:0.15,bonobo:0.15):0.05)", taxa=data, IsLabelledNewick=true);
hky = new HKY(kappa="5.0", frequencies=new Frequencies(data=data));
clockmodel = new beast.evolution.branchratemodel.StrictClockModel("1.0");
k = 0;
for (shape0 : shapes) {
sitemodel = new SiteModel(gammaCategoryCount=4, substModel=hky, shape=""+shape0);
//sim = new beast.app.seqgen.SequenceSimulator(data=data, tree=tree, sequencelength=10000, outputFileName="gammaShapeSequence.xml", siteModel=sitemodel, branchRateModel=clockmodel);
// produce gammaShapeSequence.xml
//sim.run();
mergewith = new beast.app.seqgen.MergeDataWith(template="analysis.xml", output="analysis-out.xml");
sim = new beast.app.seqgen.SequenceSimulator(data=data, tree=tree, sequencelength=10000, outputFileName="gammaShapeSequence.xml", siteModel=sitemodel, branchRateModel=clockmodel, merge=mergewith);
// produce gammaShapeSequence.xml and merge with analysis.xml to get analysis-out.xml
sim.run();
// run the analysis
mcmc = (new XMLParser()).parseFile(new File("analysis-out.xml"));
mcmc.run();
// grab estimate from the analysis
log = new LogAnalyser(new String[]{"SequenceSimulator.log"}, 2000, 10);
s = log.getMean("gammaShape");
print("iteration: " + (k++) + " shape = " + shape0 + " estimate = " + s);
estimate.add(s);
}
// create scatter plot and save to /tmp/Sample_Chart.png
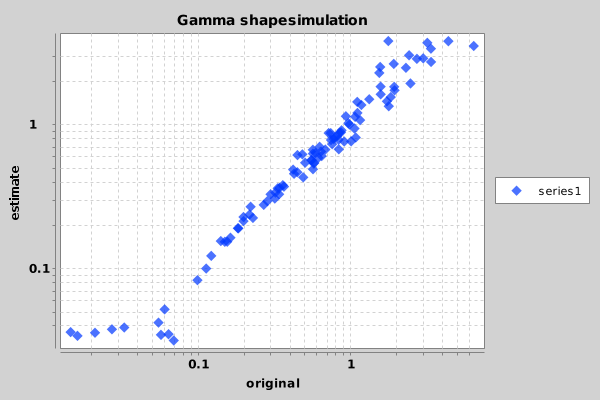
p = new Plot(x=shapes, y=estimate, title="Gamma shapensimulation", xAxisTitle="original", yAxisTitle="estimate", chartType="Scatter", isYAxisLogarithmic=true, isXAxisLogarithmic=true, output="png");
You can run the analysis in BEASTStudio, but you can also run it from the command line, which is probably a bit faster. BEASTShell has a command line interpreter that can be started with
Once you ran the script, something similar to the following image should appear in the file Sample_Chart.png.
Looks like the shape parameter can be fairly reliably recovered from a large range of shape values. Only at the extremes — below 0.05 and over 15 — the prior is drawing the estimate to the mean.
BEASTShell is a scripting language based on BeanShell 2.2 which itself is based on BeanShell. The goal of BeanShell is to provide a scripting environment supporting Java, and consequently its syntax is very much like Java. The main difference is that it is a scripting language, which means we get dynamic typing. Furthermore, there is an interactive interpreter, so you can type things like
bsh % 3+4;
bsh % print("Hello world!"); // print() is a BEASTShell command
Hello world!
bsh % "Hello world!";
bsh % x = 1 + 2 + 3 + 4;
bsh % for (i = 0; i < x; i++)
print(i);
0
1
2
3
4
5
6
7
8
9
bsh %
Here bsh % is the prompt (which you can customise), and the remainder is output to the console. Simple expressions produce the result on the console if show() is on — which it is by default. The second line is the canonical hello-world program, which is quite a bit shorter than what you would need in Java! It can even be shortened to "Hello world"; since the console print the value of expressions on screen, and the value of "Hello world"; is a String with its familiar content as value.
Note how we use print as a command. Commands are pre-defined functions that come from script files in the class-path. BEASTShell has many such commands, but before we dive in, let’s first install BEASTShell.
Installing BEASTShell
BEASTShell is a BEAST package, so to run BEASTShell you need to install BEAST first (available here). Then, you need to install the BEASTShell package. Start BEAUti and select the menu File/Manage Packages and a window pops up where you can select the BEASTShell package and click the “Install” to install the package. It is about 4MB at the moment, which may need a bit to get downloaded, so it may take a little time for the package to become available.
BEASTStudio
BEASTStudio is a basic IDE for BEASTShell and is probably a good starting point to get familiar with BEASTShell. There are many other ways to run BEASTShell scripts, including in a text-only console, in programs, as servlet, etc., but BEASTStudio is the easiest to get started. There is lots of help, demos and documentation, as well as editors with syntax colouring, a history of everything in the console and a variable inspector showing all available variables and their values. So, there is lots of interactive feedback when exploring BEASTShell programs.
BEASTStudio requires JavaFX
BEASTStudio relies on JavaFX, which means you need to run Java 7 or better, (or install JavaFX separately for Java 6, which only appears
to work on windows). If you run Java 8, JavaFX is loaded automatically, and you do not need to worry about it. If you run Java 7, it depends on the update whether it loads JavaFX or not.
Regardless, BEASTStudio attempts to load JavaFX if it is not already loaded as follows:
If the JAVA_HOME environment variable is defined, it attempts to load $JAVA_HOME/jre/lib/jfxrt.jar
If that fails, if looks for the JAVAFX_JAR environment variable
and attempts to load JAVAFX_JAR. So, if you specify JAVAFX_JAR=/usr/java/lib/jfxrt.jar then BEASTStudio attempts to load /usr/java/lib/jfxrt.jar.
If both of the above fail, it tries to load from /opt/java/jre/lib/jfxrt.jar.
If none of the above succeed, BEASTStudio will fail with an error message.
Running BEASTStudio
To start BEASTStudio, open the AppStore in BEAST and when BEASTShell is properly installed there should be an entry for BEASTStudio. Double click the icon, or select and click “launch” and BEASTStudio should display itself after a few seconds. If it does not, but the splash screen does, some libraries (e.g. JavaFX) may be missing.
Creating BEASTObjects
One of the main difference of BEASTShell is in how it treats classes that are derived from the BEASTObject class. To create a BEASTObject in Java requires calling the constructor of the object, initialising each of its inputs then
calling initAndValidate(). BEASTShell does these three steps in one single statement, for example,
import beast.evolution.alignment.*;
human = new Sequence(taxon="human", value="?"),
is the BEASTShell equivalent of
import beast.evolution.alignment.*;
... {
Sequence human = new Sequence();
human.taxonInput.setValue("human", human);
human.dataInput.setValue("?", human);
human.initAndValidate();
}
Note that the name-value pairs in creating the BEASTObject — these are independent of the order. If you leave them out, the order of inputs is used (you can check by showing the BEAST documentation with ?Sequence), which is more error prone since it can change in the future. Value do not necessarily need to be primitive values, you can use more complex objects as well. For example, a two sequence alignment can be created using
human = new Sequence(taxon="human", value="?"),
chimp = new Sequence(taxon="chimp", value="?"),
data = new Alignment(sequence=human, sequence=chimp);
Calculating tree statistics
One of the things we hoped to make easier (see previous post) is to calculate statistics on trees, such as the length of a tree. We can define the length of a tree for example like so
len(node) {
if (node.isLeaf()) {
return node.getLength();
else
return len(node.getLeft()) + len(node.getRight()) + node.getLength();
}
// to test the len method, create a tree
tree = new beast.util.TreeParser(newick="(1:0.2,(2:0.15,3:0.15):0.05)");
len(tree.getRoot());
// returns 0.55
This implementation recurses through the (presumed binary) tree with just a few lines of code. It also demonstrates how to create a tree using the TreeParser BEASTObject. If import beast.util.*; was inserted at the start, the even been shorter tree = new TreeParser(newick="(1:0.2,(2:0.15,3:0.15):0.05)"); would be sufficient.
If the tree is not binary, we can use the following for non-binary trees:
// implementation that recurses through the (potentially non-binary) tree
len2(node) {
if (node.isLeaf()) {
return node.getLength();
} else {
len = node.getLength();
for (child : node.getChildren()) {
len += len2(child);
}
return len;
}
}
len2(tree.getRoot());
// still returns 0.55
// now define a non-binary tree
tree2 = new beast.util.TreeParser(newick="(1:0.2,((2:0.1):0.1))", singlechild=true);
len2(tree2.getRoot());
// returns 0.40
An alternative implementation that loops over the nodes in just 4 lines of code:
len3(tree) {
len = 0;
for (node : tree.getNodesAsArray())
len += node.getLength();
return len;
}
len3(tree);
// returns 0.55
len3(tree2);
// returns 0.40
Getting Help
The parser recognises lines starting with question marks as cries for help. A single question mark followed by an expression brings up help on the expression (in BEASTStudio this is shown in the help panel). A double question mark followed by an object or class shows public fields and methods for that object or class (again, in the help panel when running BEASTStudio).
To get help on a command, use help(“cmd”); of alternatively ?cmd e.g.
To get help on a BEASTObject, use help(BEASTObject); e.g.
bsh % ?beast.core.MCMC
or, if you already created an MCMC object, asking help for the object will have the same results:
bsh % tree = new beast.evolution.tree.Tree()
bsh % ?tree
bsh % javap(tree)
bsh % ??tree
To get help on any other class, use help(Class); e.g.
bsh % help(java.util.ArrayList);
bsh % ??java.util.ArrayList;
bsh % data = new ArrayList();
bsh % ?data
Running demos
There are a few demos that show off capabilities of BEASTShell. To list the set of demos, use demo();. There are four demos at the moment of writing:
beanshell: a quick primer on BeanShell syntax
chart: demonstrates various 2D charts x
trace: demonstrates how to interactively inspect traces
trees: demonstrates various trees and how to display them
To run a demo, use demo(demoname); e.g. demo("chart"); to start the chart-demo.
BEASTShell commands
There is already a large number of commands that come with BEASTShell, divided into three categories:
BEAST commands which are mostly specific to BEAST.
BeanShell commands which are inherited from BeanShell. Some commands are deleted or adjusted for BEASTShell.
Math, statistical and utility functions for general purpose usage.
These are the BEAST commands (at present):
demo
demonstrate some BEASTShell capabilities in BEASTStudio
help
provide online help
c
construct a list of objecst, e.g. x=c(1,1.5,2,2.4)
assertEquals
handy for testing, e.g. assertEquals(dbeta(0.4, 5, 1, false), 0.128, 0.0001);
beast
start a BEAST run
beauti
start a BEAUti session
appstore
start the BEAST AppStore
requires
indicate some BEAST package is required, and install if not present.
trace
plot trace and show statistics of a BEAST trace file.
edit
edit BEASTObject through a dialog.
plot
plot component to plot panel or to file.
regression
calculate regression line through a series of points.
The BeanShell commands are mostly commands for starting scripts and performing shell-like functions. From the BeanShell documentation, these are a few useful commands:
source(), run() – Read a bsh script into this interpreter, or run it in a new interpreter
frame() – Display a GUI component in a Frame or JFrame.
load(), save() – Load or save serializable objects to a file.
cd(), cat(), dir(), pwd(), etc. – Unix-like shell commands
exec() – Run a native application
javap() – Print the methods and fields of an object, similar to the output of the Java javap command.
setAccessibility() – Turn on unrestricted access to private and protected components.
The over 125 math and stat commands are inspired by R’s stats and base package, and include things like rnorm to generate random numbers from the normal distribution, max to get the maximum of a list of numeric objects, or an array of objects, sum to sum a list or array of numbers, etc.
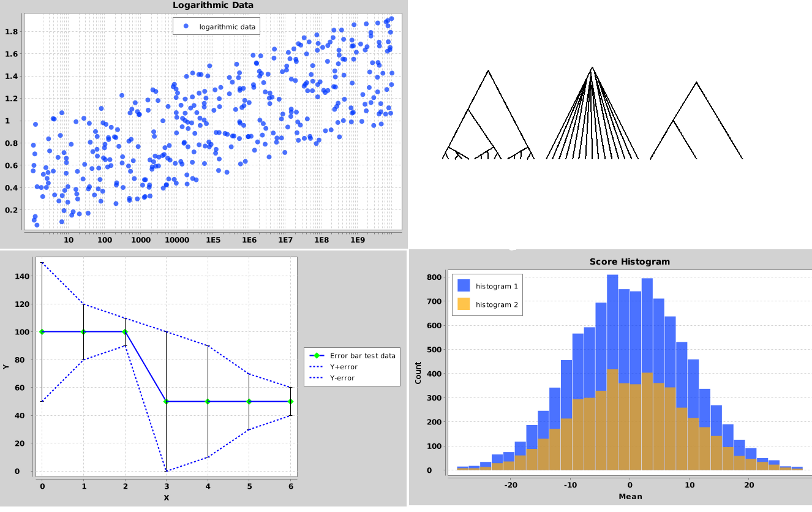
Graphs and tree-plots with BEASTStudio
BEASTShell contains a number of classes for 2D-charting and drawing trees. A few examples are shown below. To create a plot, use the beast.app.shell.Plot class. You can add various series to a plot using the beast.app.shell.Series class. For more information and options available for plots, use the help command
?beast.app.shell.Plot
?beast.app.shell.Series
Also, check out the code used in the chart-demo.
To create plots of trees, check out the classes beast.graphics.RootedTreeDrawing for single rooted trees, beast.graphics.UnrootedTreeDrawing for unrooted trees and beast.graphics.TreeDrawingGrid to draw multiple trees on a single plot.
All of the classes mentioned here will produce output in the plot-pane of BEASTStudio when new objects of them are created.
Learning more
The best way to learn more is to run the demos — read the output on the console while running the demo. Read the documentation and browse the help screen in BEASTStudio.
Next week, we will have a look on how to perform the simulation study we did before, but with much less hassle using BEASTShell.
In a previous blog, we looked at ways in which to program BEAST without having to program in Java, but use some scripting capability and specify formulas and functions in the XML specification. What we saw so far was pretty much limited to writing loggers (and a substitution model). Scripting capabilities are pretty limited, but it would be nice to be able to extend and use BEAST and its libraries without having to delve into Java, and the particular conventions used in BEASTObject classes.
Why scripting: scripting languages are dynamically typed thus simplifying code, and increasing powerful in that few lines of code can produce a lot of functionality, unlike the verbose Java language. When performance is an issue, Java implementations can be considered, noting that most of the time of MCMC calculations in BEAST tend to be in the treelikelihood, which is too complex to script. The BEAST framework can take care of most of tracking which part of the model requires recalculation after an MCMC step, so again this is not something that a script needs to pay too much attention to. Also, scripting provides a fast way to write tests. Furthermore, a script language can be used in an interactive console, which allows exploring various outputs of BEAST analysis.
Scripting is already possible through ScriptEngine implementations in Java, so you can create and access BEAST-objects that way. However, it is quite inconvenient to do so, since setting values of inputs is awkward. A successful scripting implementation should do the following:
Provide a convenient way to create and initialise BEASTObjects, for example, creating a tree from a Newick string.
Provide a convenient way to access Tree structures, e.g. calculate the total length of branches in a clade
Provide a convenient way to implement standard BEASTObjects, such as Distributions, SubstitutionModels, TreeDistributions, and BranchRateModels that can be integrated with BEAST models in an MCMC analysis.
Provide a convenient way to write junit tests.
Syntax
The first choice to make is which syntax to use — roll your own, or use an existing syntax. As much fun as it is to write parsers and design new languages, having Yet Another Scripting Language is not something the world is waiting for. Furthermore, there are plenty languages out there that already are well known and are expressive, well known and convenient enough to do the kind of things we want. Furthermore, there are scripting engines out in the wild that are already optimised for speed — though their default methods of integrating with Java might not suite the way BEAST was designed.
So, the next question becomes: which language should we use? We already disregarded compiled languages such as Java, C++, C, Objective C, C#, etc. There are heaps of interpreted languages out there — Python, Ruby, JavaScript — and statistical scripting languages — WinBUGS, R, stan, matlab, mathematica JAGS.
Popularity: Python, JavaScript, Ruby, Perl, VB and PHP appear currently the most popular according to a number of rankings, including tiobe, lang pop, and code eval blog. Readwrite has 5 ways of measuring language popularity, and again these 6 scripting languages score highest among most rankings. Among the statistical scripting languages, R has gained significant popularity in the last few years. Redmonk, has a interesting plot of languages from stackoverflow and github showing the popularity or R as well as the general purpose scripting languages.
Popularity of scripting languages is important in reducing the average learning curve; a popular syntax is probably familiar for users because they have seen them before.
Standard implementations
The Bean scripting framework and JSR-223 API are the two standard ways of integrating Java and scripting languages. The Bean framework appears dormant (latest release 2011), so let’s have a look at how some of the ScriptEngine implementations do Java-integration.
JavaScript:rhino is a Javascript engine, embedded in J2SE 6. Nashorn is Javascript engine with increased performance, but only available for Java 8. Rhino has a rich set of methods of accessing Java (see documentation). It can access methods of JavaBeans defined as getFoo(), setFoo(), isFoo() as JavaSCript properties. So, let f be a file, then f.name will call f.getName() and f.directory will call f.isDirectory().
Ruby:JRuby is a Ruby interpreter in Java, also with scripting capabilities.
R:Renjin is an R interpreter in Java written with efficiency in mind, and can be used for scripting with Java. It is aware of JavaBeans, so you can initialise a class like so:
bob <- Customer$new(name='Bob', age=36)
and it will create an object of class Customer using the empty constructor, then call setName("Bob") followed by setAge(36). This comes very close to the way we use initByName method of BEASTObject, which in Java would be
Customer bob = new Customer();
bob.initByName("name","Bob", "age", 36)
So, if the Renjin engine could be coerced into calling the code above, we would have a convenient way to create BEASTObjects.
Fastr is another R interpreter in Java, but it does not implement a ScriptEngine, and also does not support importing of R packages, while renjin does.
Stan, matlab, and mathematica have no interpreters written in Java that I am aware of.
BEASTShell
After spending quite a bit of time looking at the existing languages, an unexpected alternative presented itself: BeanShell, a scripting language with Java syntax, running on the JVM and largely forgotten. However, any Java developer will not have any problems picking up the language — it uses largely the same syntax as Java! Furthermore, it runs on the JVM and has facilities to work with Java libraries. Also, the code is sufficiently clear that it is easy to coerce the language into creating BEASTObjects in a convenient way. The resulting language is called BEASTShell. In the next post, we will have a closer look at the details and see what we can do with BEASTShell.